Netcash Shop
Our easy to use guide will get you up and running in no time!
Netcash Shop is the ultimate all-in-one eCommerce platform. With a simple, responsive website builder, online store, secure checkout, and payments already built in, you have everything you need to sell anywhere.
Whether you already have a website or are just getting started, you can integrate Netcash Shop with multiple sites or sales channels, like WordPress, Facebook, Google, and more. Manage all orders and payments effortlessly from your Shop dashboard, and power deliveries with integrated apps from Fastway, Bob Go and Droppa.
With Netcash Shop, you can build your online empire in minutes, expand your reach, and streamline operations.
Index
- Netcash Shop Service Agreement
- Netcash Shop Initial Setup
- Accessing your Netcash Shop
- Integrating the Netcash Payment Gateway
- Adding your store to any website
- Instant site design setup
- Adding and Managing Multiple Pages
- Adding your online store to WordPress site
- Connecting your domain
- Migrate to Netcash Shop
- Products
- Shipping and pickup
- Running your shop, orders, customers and security
- How to Upgrade/Downgrade your Netcash Shop plan
- Netcash shop policies
- Netcash Billing
Netcash Shop Service Agreement
- Navigate to Account profile > My Space > Agreements
- Under the Shop product icon please insert your service agreement token sent to you via email. Click on submit, alternatively click on the Send Signature Token button if you do not have a token.
Note: Please ensure the Netcash account super user has granted system user permissions to the person responsible for setting up and editing your Netcash Shop.
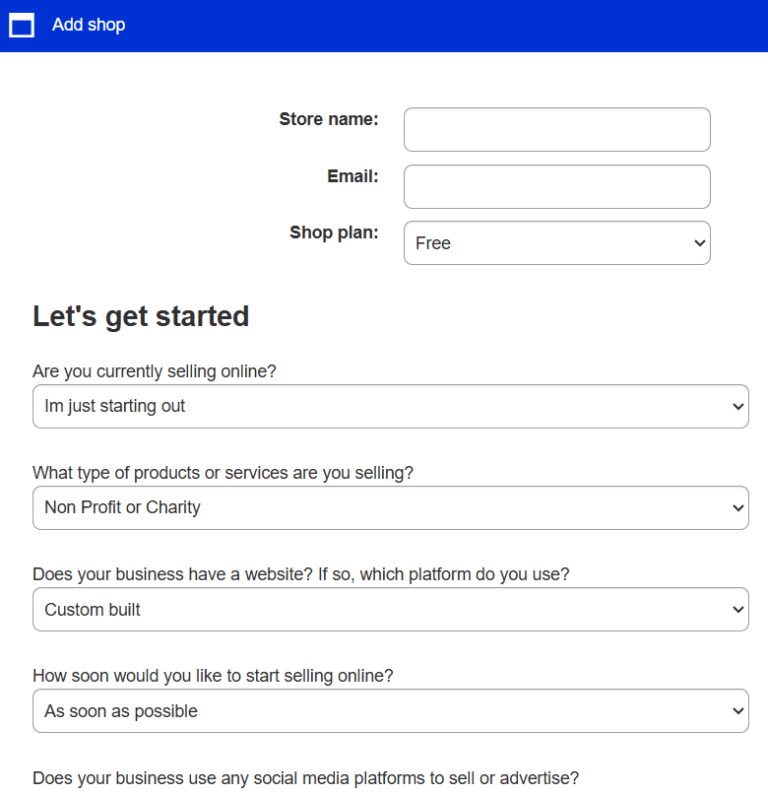
Netcash Shop Initial Setup
- Navigate to Services > Shop > Manage > Manage my shop
- In the top right corner, click on the Add button.
- You will be presented with a pop-up to input your Shop information.
- Insert your stores full name, the email address and select your plan.
- Complete the 5-question questionnaire.
- Click Submit.
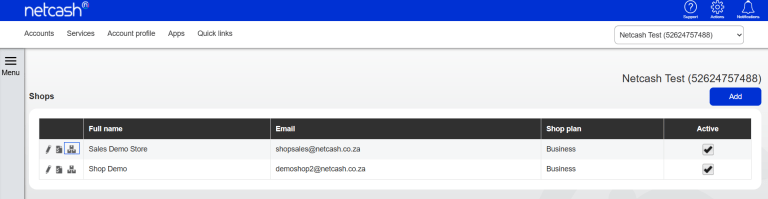
Note:
- Deactivate your store by using the active tick box.
- Edit your shop plan by clicking on the pencil icon.
- access your store control panel by clicking on the control icon.
Accessing your Netcash Shop
After you sign-up for Netcash Shop you will receive your login credentials in the inbox of the email address you used to register for Netcash Shop.
Navigate to Services > Shop > Manage > Manage shop
Click on the control panel icon, or alternatively access Shop via the shop website
Integrating the Netcash Payment Gateway (Pay Now)
To accept payments from your customers, you first need to activate the Pay Now service in your Netcash account. To activate this service if not done so, log in to your account, navigate > My Space > Agreements, select and insert token into the Pay Now service agreement bar.
The service status will update to ‘requested’ and your Netcash Account Manager will be in touch to help you complete the application.
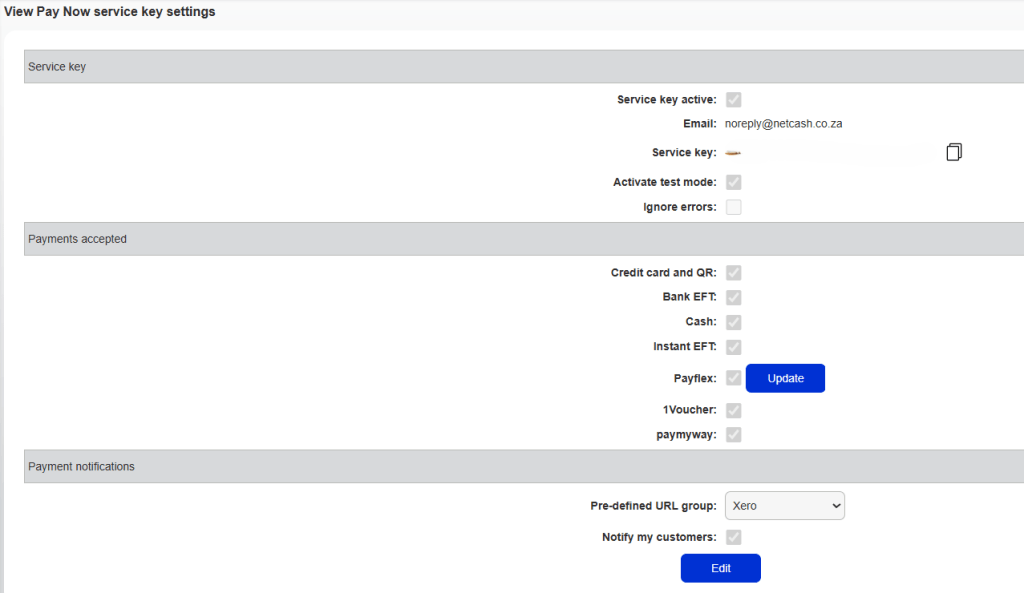
When the Pay Now service has been approved and activated, you can login to your Merchant account and create your service key:
Navigate to Account Profile > Netconnector > Pay Now
- Tick the Service key Active and include the email address you would like all Pay Now notifications to be sent to.
- Only activate test mode if you are testing.
- You can select the payment methods that you would like to offer your customers
Once you have created your Pay Now service key, you can copy and paste the Pay Now service key into the space provided in your Netcash Shop control panel.
Add Netcash’s payment gateway in your store:
- From your store’s admin panel, go to Payment.
- Select ‘Netcash Pay Now Gateway’
- Copy your unique service key from your Netcash account and paste it in the field provided
- Enter the display name for this payment method at checkout
- Keep the Show at checkout setting as Enabled to offer this payment method at checkout.
- (optional) Add payment instructions for this payment method at checkout

How ordering with an online payment method works in a nutshell:
- A customer is ready to make a purchase at your store and can choose one of the Netcash Pay Now payment methods.
- The online store sends information about the customer’s order to Netcash for processing.
- The Netcash Pay Now plugin is integrated so your customer will enter the payment information right in your store’s checkout and confirm the payment without being redirected to another portal.
- Netcash requests payment from the card’s issuing bank. If the card is valid and the account has sufficient funds, the card’s issuing bank authorises the transaction and releases funds to Netcash (if there is an issue, the card’s issuing bank declines the transaction).
- After a customer makes payment, the payment is transferred to your Netcash merchant account.
Netcash automatically sends the information about a successful transaction to the online store and the store sets Paid status for the processed order (if the transaction was declined, the payment processor informs the online store about it and the store sets Cancelled status for such an order).
You can check order payment statuses in your store’s admin panel > My Sales section.
Netcash must process a transaction first, then funds your merchant account. For successfully processed orders, you can withdraw the money from your Netcash account to your bank account.
Adding your store to any website
Instant site design setup
- Instant Site benefits
- Setting up an Instant site for your business
- Customise site appearance
- Add your brand story and other content
- Use built-in eCommerce
- Enhancing SEO for Instant Sites
- Connect your own domain
- Verify the site ownership with third-party services
- Allow search engines to index Instant Site
- Write the titles and meta-descriptions for your products
- Best practices for establishing your Instant Site
Adding and Managing Multiple Pages
- Adding a new page to your site
- Changing a page URL and name
- Customising page design
- Adding a page to the navigation menu
- Hiding a page from visitors
- Deleting pages
Adding your online store to WordPress site
Read about Adding your online store to WordPress site
- Adding your online store to WordPress site
- Adding an online store to WordPress.org
- Showing categories on different site pages
- Featuring one product on a page
- Featuring products with widgets
- Adding store search
- Adding drop-down menu with categories
- Offering one login to site and store for customers
- Including products into website sitemap
- FAQ
Connecting your domain
- Free customisable domain
- Connecting your own domain
- Connecting a Domains.co.za domain to your Netcash Shop
- Securing your domain with HTTPS
- Connect a GoDaddy domain
Migrate to Netcash Shop
- How to migrate to Netcash Shop
- How to migrate from Ecwid to Netcash Shop
- How to migrate from WooCommerce to Netcash Shop
- Import customers
Products
- Customer Product Reviews
- Customisable URL slugs
- Product subtitles
- Product ribbons
- Pay What You Want pricing
- Buy One Get One Free Pricing
- Adding, updating and deleting products
- Guide to product details
- Product types and attributes
- Digital Products
- Gift cards
- Selling services
- Products categories
- Product options
- Product Variations
- Product inventory tracking
- Product sort order
- Related products
- Importing Products
- Order quantity limits
- Currency Converter Apps
- Adding Product Videos to Product Pages
- Sale Prices for Products
- Bulk Product Editor
- Product colour swatches
Shipping and pickup
- Local delivery
- Product-specific shipping rates
- Choosing the right shipping strategy for you store
- Real-time rates from carriers
- Setting up in-store pickup
- Custom rates based on subtotal and weight
- Adding and managing destination zones
- Flat rates
- Free shipping
- Fastway User Guide
- Droppa Shipping User Guide
- Bob Go Smart Shipping Guide
Running your shop, orders, customers and security

How to Upgrade/Downgrade your Netcash Shop plan
If you’re ready to give your shop more functionalities, upgrading to a paid Netcash Shop plan is a great option. There are three paid plans available, and you can compare them to see which one would best suit your needs. Follow these steps to upgrade your plan:
- First, log in to your Netcash account.
- Navigate to Services > Shop > Manage Shop
- Click on the ‘pencil’ icon to upgrade or downgrade your Netcash Shop monthly plan.
If you upgrade your plan from one pricing plan to a higher plan e.g. from Venture to Business, you’ll be charged the prorated difference between the two plans based on the remaining time in your billing cycle. Your billing cycle and renewal date won’t change. This means that your next invoice will be higher in value than the new plan’s monthly amount, as the prorated amount will be added to it.
Netcash shop policies
If you are starting a new business, or you are a seasoned trader, you must meet certain legal requirements and standard business requirements. Besides financial regulations, tax obligations and employment laws you must have the basics in place to meet compliance standards.
Netcash has taken some of the pain out of getting started by creating a series of draft legal templates to assist you in saving time, money and giving guidance through the setup process.
In our efforts to support local South African SMME’s, we have created draft templates for the following pages to live on your website:
- About Us
- Privacy Policy including POPIA
- Returns Policy
- Shipping and Payment Information
- Trading Terms and Conditions
Navigate to Services > Shop > Manage policies
Netcash Billing
Billing cycles
Your most recent Netcash invoice is available to view in your Netcash account on the 1st of every month.
To view your invoice/s:
- Log into your Netcash account.
- Navigate to Services > Account > Reports > Invoices.
- Select the invoice that you would like to view.
- Download either a detailed or summarized invoice.
Paying your Netcash invoice
Netcash will automatically deduct your fees on the 1st of the month from the funds in your Netcash merchant account provided there are available fund in your Netcash account.
If there are no funds available, then you will need to make a deposit to your Netcash merchant account and use your 11-digit Netcash account number as the deposit reference and it will be automatically added to your available balance.
To see what funds are available in your account, view your Netcash Statement: Services > Account > Reports > Statement
Netcash has multiple clearing accounts available, depending on which bank you use. To find the bank details you would like to use simply navigate to: Services > Account > Manage account > Netcash clearing accounts
To read more about Netcash Shop please view our Netcash Shop Helpcenter
Need more assistance?
Contact your Relationship Consultant on 0861 338 338 or email us on support@netcash.co.za
