System permissions
Estimated reading: 3 minutes
2472 views
Our easy to use guide will get you up and running in no time!
Create a contact
- Select Account profile.
- Click on Contact Profiles> Contacts.
- Click on Add account contact button.
- Complete the required fields. To delete a contact, click on the waste bin to the left and then click Submit.
- Your contact will now be added to the system. Note that certain fields are mandatory. ID numbers are validated and Passport numbers need to be between 10 and 13 characters in length.
- Edit the contact by clicking on the pencil to the left.
- Tick the system user tick box if you require the contact to be a system user.

Create system users
Each Netcash account has one system super user. This user has full rights and controls all aspects of the Netcash account. By default, the super user is a principal of the legal entity (director, member, partner etc.)
- System users can only be selected from the contact users list. You need to add a contact before you can add a system user.
- Select Account profile.
- Click on System users > Manage system users. A list of all contacts/users will be displayed.
- Edit the user entry by clicking on the pencil icon.
- Click on Manage login.
- Choose a username for the new profile and click on Generate.
- Once the login details have been generated, click on the Back button.

Setting up service and account profile permissions
- Select Account Profile.
- Click on System users > Manage system users.
- Edit the users by clicking on the pencil to the left.
- Click the Manage Permissions button.
- Select the account/accounts that you would grant access to.
- Click on the Select Accounts button.
- Click on OK.
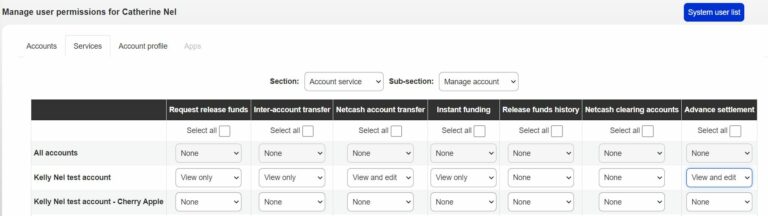
Permissions consist of two menu items. The Services menu and the Account profile menu
- Click on the Services tab to select permissions relating to the Netcash services functionality.
- Choose a Section and Sub-section.
- Allocate permissions for each sub-section using the down arrows.
- Click on Save Changes.
- Click on the Account profile tab to select permissions for the Account profile functionality.
- Choose a Section and sub-section
- Allocate permissions for each sub-section using the down arrows.
- Click on Save Changes.
Copy permissions
Permissions relate to Services that you have activated on the Netcash system and allow you to control the levels of access that each of your Netcash system users has.
- Select Account Profile.
- Click on System users > Copy permissions.
- Select the user from which it will be copied.
- Select the user to which permissions will be applied.
- Click on Apply for permissions.

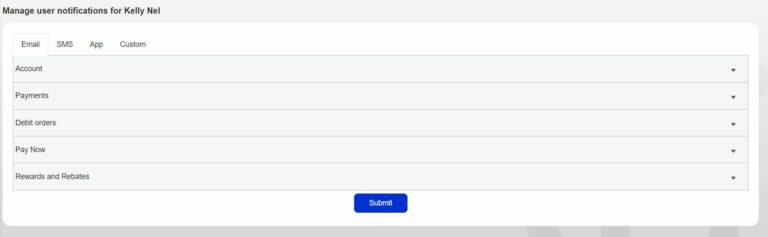
Manage notification permissions
- Select Account Profile.
- Click on System users > Notifications.
- Click on the pencil icon to the left of the user that you wish to edit.
- Click on the service to edit the user notifications.
Need more assistance?
Contact your Relationship Consultant on 0861 338 338 or email us on support@netcash.co.za
