Account service QSG
Our easy to use guide will get you up and running in no time!
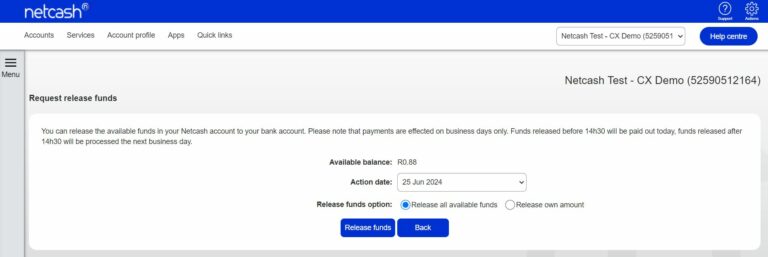
Request Release funds
The release funds option allows you to release your available funds that is in your Netcash account into your bank account that is linked to your Netcash account
- Select Services
- Click on Account from the dropdown menu
- Click on Manage account > Request release funds
- Click on the Release funds button
- Your available balance is displayed
- Select Release all available funds or Release own amount
- Click on the Release funds button
- Funds are released to your bank account linked to your Netcash profile
Note:
- The amount available for release is finalised after 13h00 on the day of release. This is calculated on the available balance.
- Funds will be available in your bank account the next day and will reflect the date on which the release was requested
- Authorisation cut-off time is 14h30 on the payment day.
- Valid payment dates are Monday to Friday (excluding public holidays)
Release funds history
- Select Services.
- Click on Account from the dropdown menu.
- Click on Manage account > Release funds history.

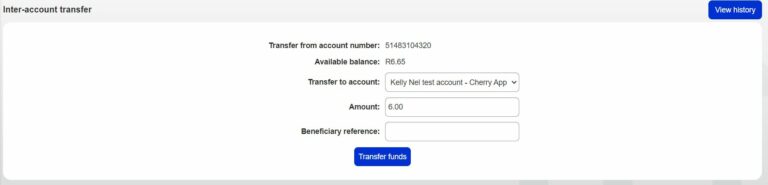
Inter-account transfer
This Functionality allows you transfer funds across your Netcash accounts, from your main account to your sub accounts or from your sub accounts to your main account.
- Select Services
- Click on Account from the dropdown menu
- Click on Manage account > Inter-account transfer
- Click on the Transfer to account drop-down box > select the receiving account
- Insert the amount to be transferred
- Insert a reference for the receiving account
- Click on Transfer funds
Netcash account transfer
Transfer funds to other Netcash accounts,
- Click on Services/Account/Manage.
- Account/ Netcash account transfer.
- Click on Add New.
- Insert the account number for funds to transfer.
- Add Amount.
- Add Beneficiary reference.
- Insert Extra fields if required for reconciliation.
- Click on Submit.
- Select the bank transfer batch that has been created.
- Click on Transfer funds.
- Click on Entry values checked and verified.
- Click on Confirm transfer.
Viewing invoices and statements
Viewing invoices
- Select Services.
- Click on Account from the dropdown menu.
- Click on Reports > Invoices.
- Choose detailed or summarised.
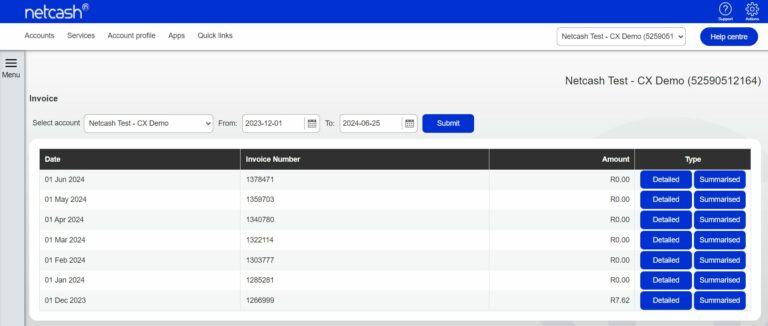
Note: Should you wish to download your invoice please click on the download option and select the file format required. Use the select account dropdown to access invoices on sub-accounts.
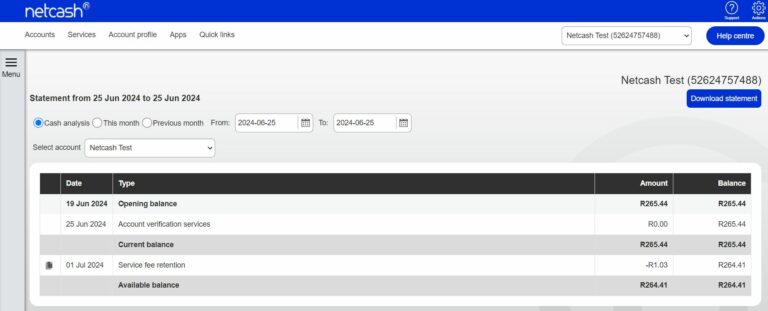
Viewing statements
Your statement allows you to see all the transactional activity that has been processed through your Netcash account, such as batches processed, Pay Now transactions, AVS transactions, deposits, bank transfers, service fee retention, etc.
- Select Services.
- Click on Account from the dropdown menu.
- Click on Reports > Statement.
- Choose the statement you would like to view from the available options:
- Cash analysis
- This month
- Previous month
- Date range
- Download the statement by clicking the Download statement button. There are various formats available to save the download such as PDF, Excel etc.
Note: The Available balance is what is available to be transferred out of your Netcash account to your bank account. Service fees and retentions are included in the Available balance calculation.
To view the individual transaction details per statement entry, click on the view report icon.
The report may be downloaded in PDF, Excel etc.
Service Fees
These are pre-determined and agreed fees for transactions processed on your behalf on the Netcash system. Service fees are accumulated during the course of the month and reflect as a retention amount. Service fees are held as a negative amount in retention and invoiced on the 1st of following month.
Retentions
Security retention: This is the amount being retained as security retention to be provided to the banks against the value of your Debit Order batch. Any amount remaining after 22 working days forms part of the available balance on your Netcash account.
Unpaid Retention:
This is the amount being retained from the Debit Order batch value to cover returned transactions. Any remaining balance will become part of your available balance after 22 working days.
Validating bank account & ID numbers
Bank account validation
Select Services.
Click on Account from the dropdown menu.
Click on Tools > Validate bank account.
Complete the required fields and click on Check.
The results of the validation are then displayed.
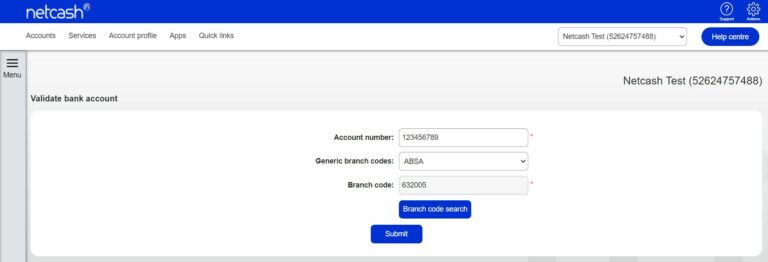
Note: Validating bank account numbers checks to see if an account is valid for a particular bank. The service does not determine whether the account is open or closed or exists. For detailed information on branch codes and account number tips, please select Account Number Tips from the Tools menu.
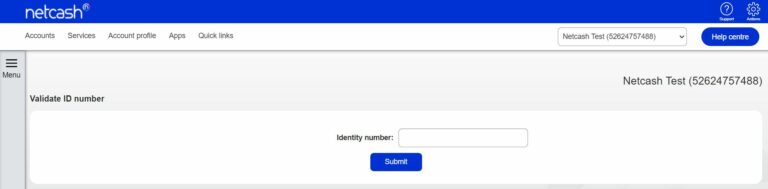
ID number validation
Select Services.
Click on Account from the dropdown menu.
Click on Tools > Validate ID Number
Insert the ID number you want to validate and click on Check.
The results of the validation are then displayed.
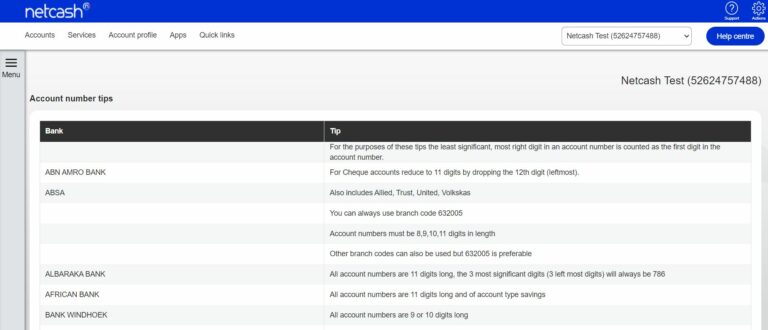
Accessing account number tips
Select Services.
Click on Account from the dropdown menu.
Click on Tools > Account number tips.
A list of tips regarding account number length, range, branch code and account type is displayed.
2 factor authentication
Use Google Authenticator to authorise payments
Google Authenticator is a free App that can be downloaded from your App Store and synchronised with your Netcash account, allowing you to generate codes to be inserted when authorising payment batches.
A few reasons why you should elect to use 2 Factor:
Not reliant on cell phone network to be up.
No delays in receiving codes.
Can be used when you are travelling abroad.
Does not require data (works offline).
How to link 2 Factor Authentication to your Netcash account:
Login to Netcash clicks on Account Profile / My Space / Authentication.
Click on Edit and then on the 2 Factor radio button.
Insert your One Time Pin (OTP).
Download Google Authenticator on your Android or Apple mobile device.
Click on Generate QR code.
Scan the code with the Google Authenticator app on your phone.
Insert the authenticator Pin.
Click on Submit.
In Google Authenticator click Add Account.
Netcash clearing accounts
Select Services.
Click on Account from the dropdown menu.
Click on Manage account > Netcash clearing accounts.
Select the bank from the drop-down menu to which you will be making payment
The Netcash bank account details for that particular bank will be displayed
Please use the correct deposit reference
Click on the Print details button to print to PDF
Click on Bank Letter button to download a Bank account confirmation letter for the bank selected
Creating a Sub Account
This is where you will be able to create a sub-account. A sub-account is another Netcash account that is linked to your main/primary account. It acts like a pocket account to your main account. It has its own Netcash account number and you can process a completely different service on this account to what you are processing in your main account, this would make reconciling much easier. You are also able to have multiple sub-accounts.
Select Account Profile
Click Registration profiles
Select Create sub-account
The below is what you are required to
Complete when creating a new sub-account
Account detail: Insert the name that you would like to call this account, this would reflect next to the Account name/Trading name of your main account
Contact detail: Insert all your contact details such as web address, contact numbers and a description of your business
Physical address detail: Insert the Physical address of your business
Postal address detail: Insert the postal address of your business
Bank Details: Your primary Netcash account bank details will be displayed by default for this sub account.
If you would like to change the bank account details, please untick the Use primary account banking details block. You will be notified to upload your proof of bank account. Click on the upload file button at the bottom of the page and upload your proof of bank account. Once the proof of bank account has been uploaded the new bank details will be verified and updated accordingly. Alternatively, you can send your Account support the proof of bank account to assist with verification.
Abbreviated name: This would apply if you will be making use of Debit orders on this sub-account, you can select to either keep the abbreviated name as per the main account or create a new abbreviated name for this sub-account
Account users: You are able to select which users you would like to be active on this sub-account
Complete: Once you are happy with all information captured click Complete
Display an error message when creating sub-accounts
Account detail: Insert the name that you would like to call this account, this would reflect next to the Account name/ Trading name of your main account
Combined, the primary and sub-account names may not exceed 50 characters
