Debit Orders QSG
Our easy to use guide will get you up and running in no time!
Index
- Working with groups
- Managing sections
- Debit order masterfiles
- Export options
- Filters and searching
- Creating debit order batches
- Viewing, editing and authorising debit order batches
- Lock batch
- Managing batches
- Batch reports
- Viewing unpaid reports and managing notifications
- Understanding batch statistics and checking the Masterfile audit report
- Checking dates and viewing your statement
- How to release funds to your bank account
Working with groups
Groups allow you to categorise your debit orders in order to assist you when working with certain types of customers or specific dates in your Masterfile. Groups also make it easier to select a number of customers to be added to a batch simultaneously.
The most common groups used are:
- Processing date
- Service type
- Product Type
- Frequency – weekly, monthly, annually
- Division/region – KZN, Gauteng etc
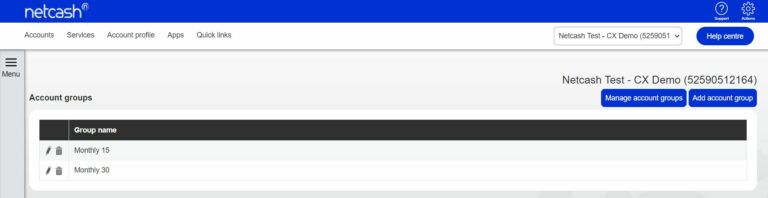
Creating groups
- Select Services.
- Click on Debit orders from the dropdown menu.
- Click on Service profile > Groups.
- Click on the Add account group button.
- Insert the name of your group and submit.
- Your group will now appear in the Group list.
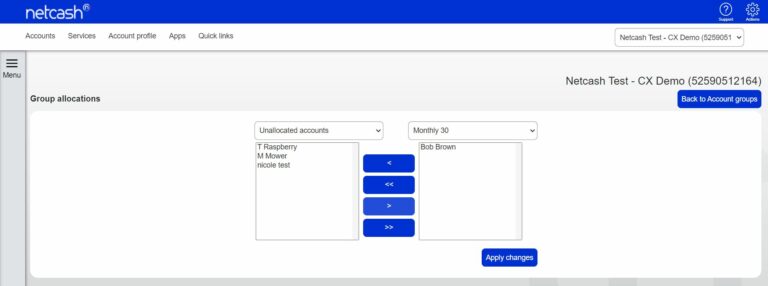
Managing customers in groups
- Select Services.
- Select Debit orders from the dropdown menu.
- Click on Service profile > Groups.
- Click on the Manage account groups button.
- You are now presented with two boxes:
The box on the left allows you to choose customers to add to a group, they can either be unallocated (not currently in a group) or they can be an existing group.
The box on the right allows you to select the group to that you want to add customers to, note that you can add one group to another group.
Single arrows move one at a time and double arrows move all items in the box, note that you can move customers to a group or from a group.
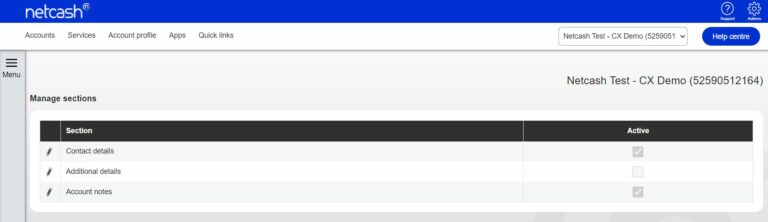
Managing sections
Sections control which containers will be displayed when working with Masterfiles. If you do not use a particular section, you can make it inactive and therefore it will not display in the Masterfile capture screen.
- Select Services.
- Click on Debit orders from the dropdown menu.
- Click on Service profile > Sections.
- You are now presented with sections in the Masterfile that you have the ability to make active or inactive.
- These include:
– Contact details
– Additional details
– Account notes
- By clicking on the Pencil to the left of the section you are able to select active/inactive and Submit.
Debit Order masterfiles
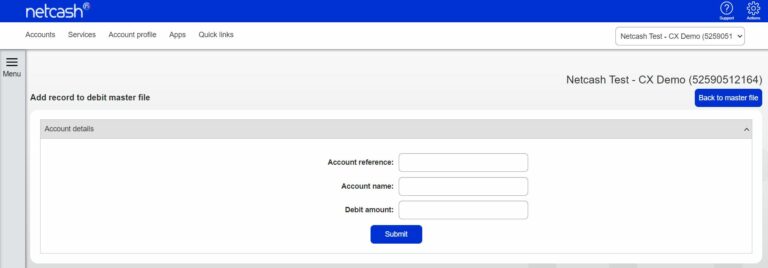
Add a new customer to your masterfile
- Select Services.
- Click on Debit orders from the dropdown menu.
- Click on Manage debit orders > Master file.
- Click on the Add Account button.
- Insert a unique account reference.
- Insert the Account name, company name or surname followed by initials.
- Insert the Debit amount – The default amount to be collected each month. (Amounts are editable when creating debit batches).
- Click on Submit.
Insert bank account details
Expand the Bank account container by clicking on the down arrow to the right of the container heading.
Payment method – Bank account.
– Insert bank account name.
– Insert the bank account number – includes leading Zero if applicable.
– Select the Generic branch code from the dropdown list or type the branch code in the field provided.
– Click on Submit.
Netcash will now validate the bank account and branch code and accept the record if successfully validated. If the account fails validation then the bank account record will not be added to the Masterfile.
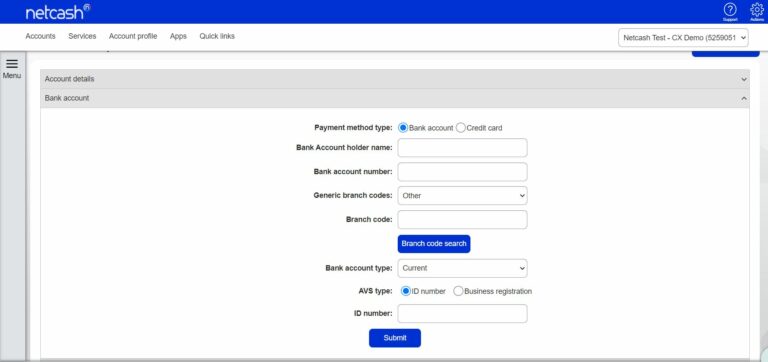
Note:
- Insert ID number if you would like to verify bank account details.
- Account details and bank account information is the minimum amount of information required in order to create a Masterfile entry that can be processed in a debit order batch.
Insert credit card details
- Expand the Bank account container by clicking on the down arrow to the right of the container heading.
- Payment type – select Credit Card.
- Click on Submit card details.
- Insert the credit card number, expiry date and name.
- Click on Submit.
- Card details will be validated, close the window to return to the Masterfile.
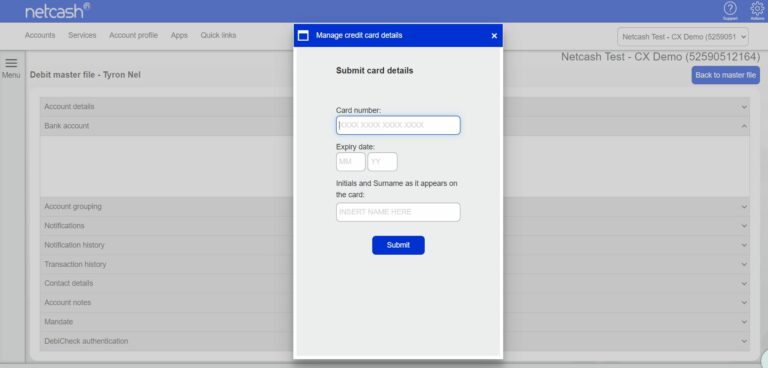
Note:
Netcash is a level 1 PCI compliant company. This means that we are not permitted to retain credit card account details, and this is done in order to prevent fraud. Once the card details have been entered, the credit card number will be masked (only the first and last 4 digits are displayed and the remainder are zero-filled).
A card token is generated and displayed below the card details. Tokens represent card details and can be used to submit transactions electronically to Netcash. Tokens will expire when cards expire.
Adding your customer to a group
Account groupings are used to sort customers and assist you with selecting certain groups of customers for processing. Typically customers use this for the day on which to run the debit order batch, although you can create any group of your liking and you can add one customers to numerous groups if required.
The account grouping section appears directly below banking details.
- Click on Edit.
- Select the group/groups that you would like to add the customer to.
- Click on Submit.

Editing customers in your Masterfile
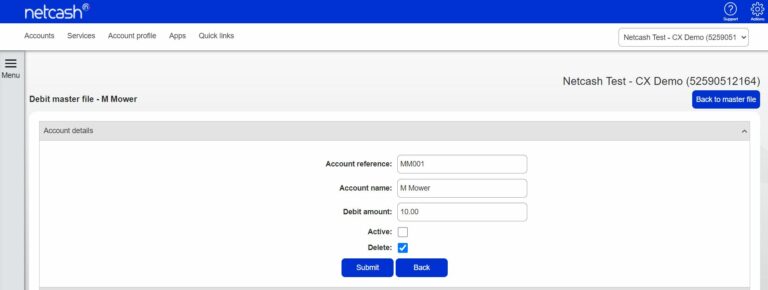
In the Masterfile list view, by clicking on the Pencil on the left of the Masterfile entry, you are able to edit all information of your customer.
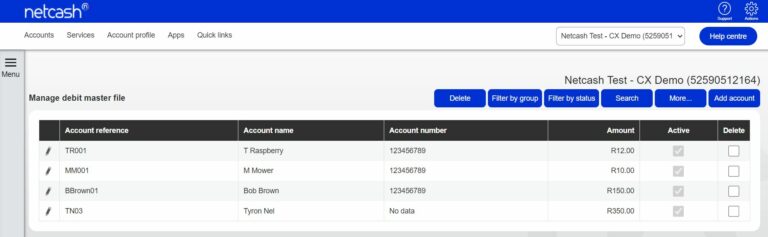
Deleting Masterfile entries
Click on the Pencil on the left of the Masterfile entry to edit the customer. Select the Account details container, click on Edit, tick the Delete this account box and then click on Submit.
Note: You can also make customers inactive, which will exclude them from selection for batches.
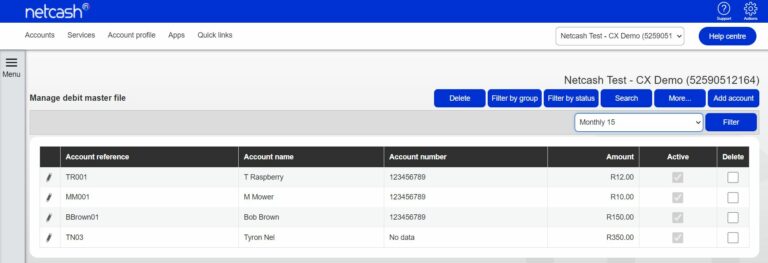
Sorting customers in your Masterfile
Customers in your Masterfile are grouped in grid form on the Manage Masterfile screen. Each column in the list is sortable by clicking on the heading. Sorting can be ascending or descending. Click once for ascending, and click again for descending. By sorting, all pages of your Masterfile are sorted.
Transaction history
Transaction History lists the transactions processed. Any unpaid transactions will be shown in red together with the reason code and the debit order returned to date. The details of each transaction can be saved to pdf.
Export Options
Download Report
The More button allows you to export the data in various export formats, these include:
- XML
- CSV
- MHTML
- Excel
- TIFF
- Word
To export data, click on the More button and then on the Export icon. Select the format required and the download will begin, check the default downloads folder on your computer for the required report.
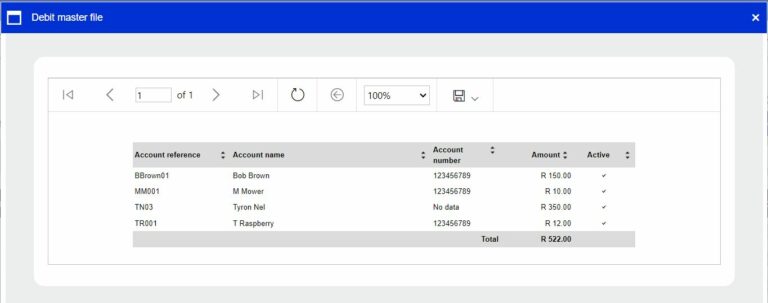
CSV
The CSV button allows you to download all fields in the Masterfile, this includes all containers in the edit/add Masterfile screen. CSV files usually open in Excel and all data will appear in column 1.
Should you require each field to appear in a separate column, then do the following:
- Select column A.
- Click on Data, Text to columns.
- Click on Next, Delimiters – Tab.
- Click on Finish.
Filters and searching
Filters
Filters allow you to work with specific data in your Masterfile.
The filter by group button will allow you to work with customers in a specific group, once selected, click on the down arrow and select the group from the list provided.
The filter by status button allows you to work with customers in a specific status, these include:
- Active
- Inactive
- Deleted
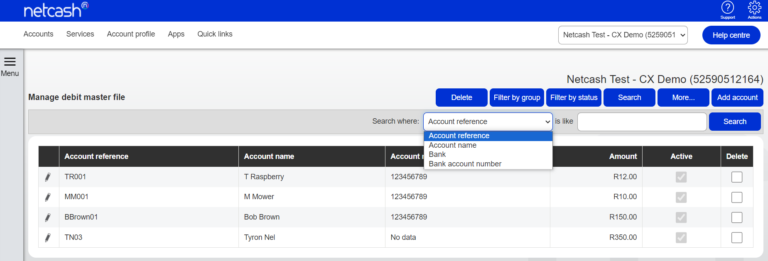
Search
The search function allows you to look for a specific Masterfile entry/entries by inserting the Account reference, Account name, Bank or Bank account number:
- Click on the Search button.
- Select the Search where criteria by clicking on the Down arrow.
- Type your search request data in the Is like field.
- Click on the Search button.
Service features
| 2 Day debits | Sameday service | |
| Recommended for: | Recurring monthly debits. | Once off or late debit runs. |
| Cut-off time: | By 12 midnight 2 working days before action date. | By 11am on action date and by 11am on a Friday for a Saturday action date. |
| Funds available in Netcash account: | On Action date. | One business day after action date. |
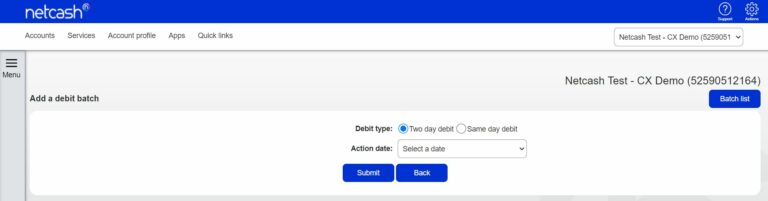
Creating Debit Order batches
- Select Services.
- Click on Debit orders from the dropdown menu.
- Click on Manage debit orders > Debit batches.
- Click on the Add debit batch button.
- Select the debit type.
- Select the Action date – this is the day that the customers bank account will be debited.
- Click on Submit.
8. Select the customers that you wish to add to this batch.This can be done by:
9. Selecting individual customers and click on the Add Selected to batch button.
10. Filter by group, select group and select Add selected to a batch button.
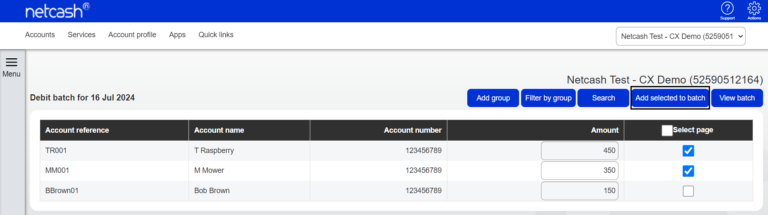
Note: You can select an entire page by checking the Select page box at the top of the right side column.
Viewing, editing and authorising Debit Order batches
Viewing and editing Debit Order batches
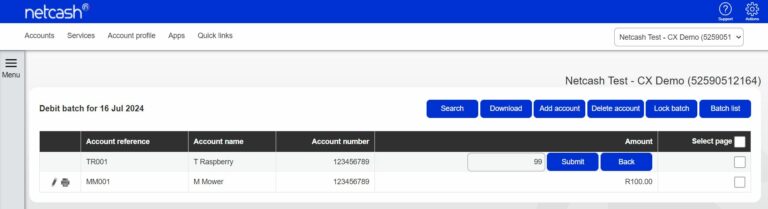
- Once all customers have been added to the batch, click on the View batch button.
- By clicking on the Download button you are able to export the batch report into the standard formats.
- To edit an amount/s, click on the Pencil to the left of the customer.
- To delete a customer, select the row and click on Delete Account.
- If you are ready to authorise the batch, click on the Batch list.
Batches that have exceeded limits cannot be authorised. Please contact Netcash to arrange a limit increase or click on the increase limit button during the batch authorisation process, your Relationship Consultant will contact you.
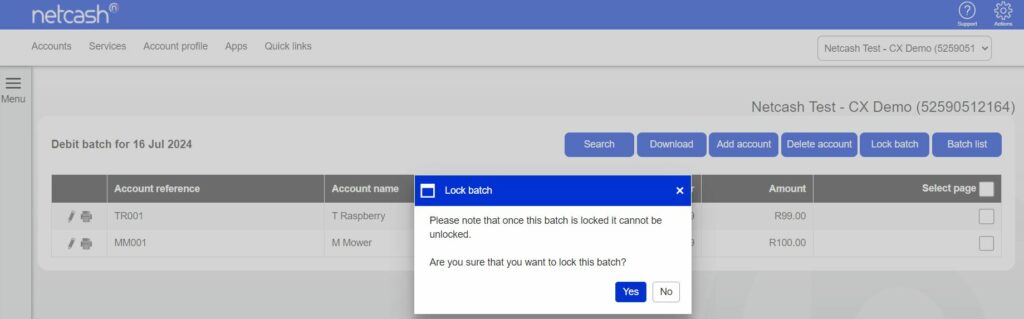
Lock batch
To lock a batch from any further editing select the edit icon and click on Lock batch.
Review the onscreen message and click on Yes if you would like to proceed. Please note that the batch cannot be unlocked.
The lock batch feature is applicable to all batches created on the Netcash platform. Imported batches may have the lock batch feature activated in the NetConnector settings, in which case they will already be locked
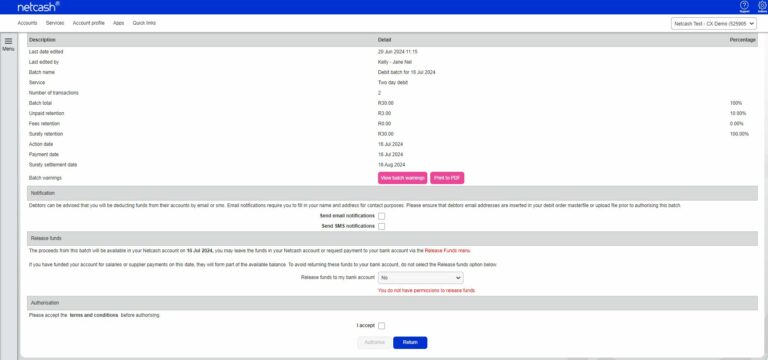
Authorising a Debit Order batch
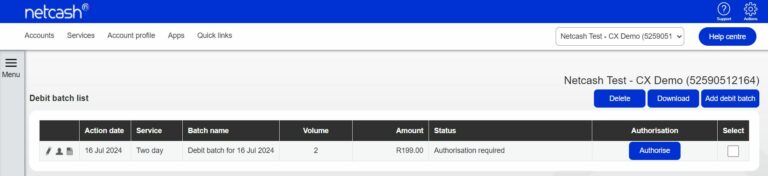
- Click on the authorise button
Batch details will be displayed such as the fees, retentions and payment date
Batch warnings -A batch warning button displayed in pink indicates warnings in the batch. Batch warnings will display info in the batch such as duplicate bank accounts and account details changed. You can choose to make corrections or proceed to authorise the batch without amendments.
Select “Email or SMS” notifications if you would like to notify your customers of the debits to be processed to their accounts.
Release funds to my bank account:
a) Yes: Netcash will pay the proceeds of the batch fewer deductions to your bank account, when available.
b) No: Proceeds will be credited to your Netcash account only – this creates an available balance for salary and creditor payments.
Accept the Terms and Conditions – the screen will then refresh and display an Authorise button.
Click on the Authorise button.
Your batch is now authorised, click Ok.
Your batch will now be displayed with an Unauthorise button in the Authorisation column – Batches can be unauthorised for further editing or deletion up until the cut-off time for that service (Two day or Same day service).
Note: It is also necessary that the option from the dropdown box next to Release Funds to My Account on the Authorization screen be selected. Only if the yes option is selected will funds be automatically released, otherwise it will be necessary to manually release the funds by going to the:
- Account
- Manage Account
- Release funds
This will result in a delay in the transfer of the proceeds of the available balance.
Managing batches
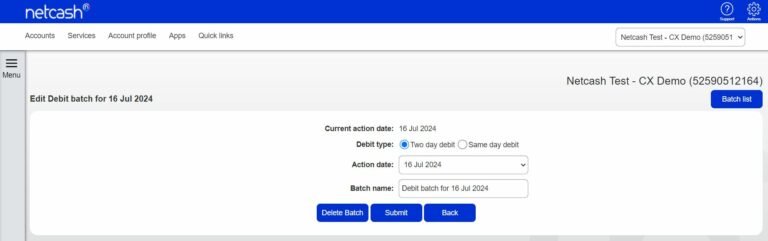
Editing dates/service types and deleting batches
- In the Debit, batches view click on the pencil to the left of the batch.
- Select a new action date if required – Sameday and 2-day batches appear in the list. Click on Submit.
- Batches can be deleted by clicking on the Delete batch button.
Note:
- There is no restriction to the number of Sameday and 2-day batches which can be created for a specific action date.
- Single transaction batches will not pay out until 22 working days have elapsed – refer to your Relationship Consultant for additional detail.
- If you have exceeded your line or daily limit, please contact Netcash to arrange a limit increase.
- Batches that have exceeded limits cannot be authorised.
- Authorised batches cannot be edited (unauthorise first).
- Action dates and service types can be edited by clicking on the pencil in the batch list screen.
- If you do not see an authorise button, you do not have the necessary permissions. Please refer to your system superuser to provide them with permissions.
- Authorisation column narratives:
– Authorise: Required to be authorised. Unauthorise – batch is authorised.
– Co-auth: Requires additional authoriser/s.
– Date expired: The batch has passed the cut-off and has not been authorised.
– Transactions required: No transactions/clients have been added to the batch.
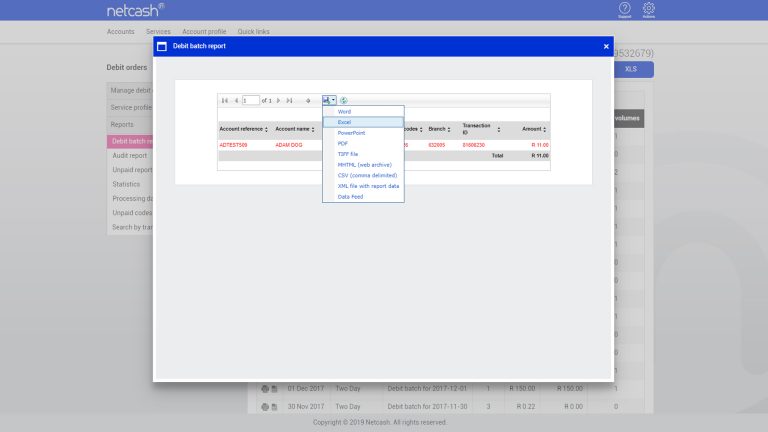
Batch reports
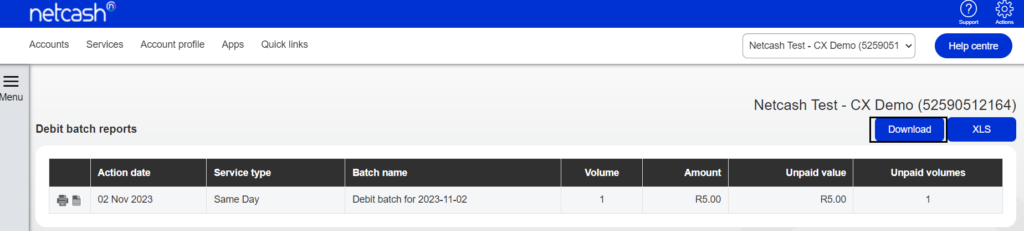
Batches that have been authorised will appear in the batch report menu after the cut-off time for that service, to obtain your batch report:
- Click on Services.
- Click on Debit orders from the dropdown menu.
- Click on Reports > Debit batch reports.
- A list of processed batches will appear.
- Click on the Printer to the left of the batch to obtain a report.
- Choose the Format you require and Download.
Note: Processed batches that have passed their action date may contain unpaid transactions. These will be displayed in red with a reason code. For a list of reason codes, click on Reports > Unpaid codes.
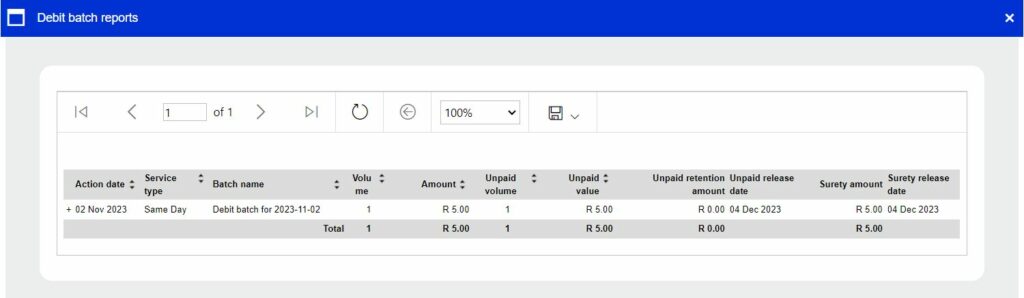
- To view additional information on your batch, click on View batch detail report.
- Export in the required format.
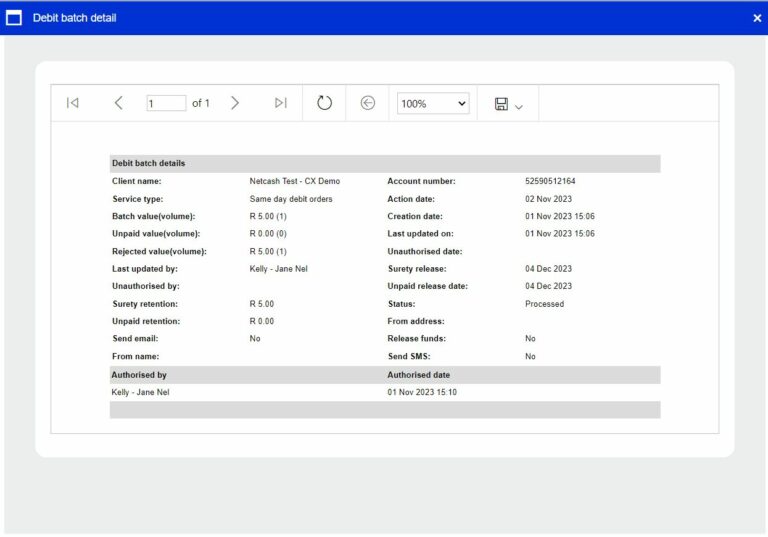
To view the security retention and unpaid retention with release dates per debit batch, click on the download button. Please note that retentions may differ at the date of release due to unpaids being returned to your Netcash account.
Viewing unpaid reports and managing notifications
Viewing your unpaid report
The Unpaid report allows you to monitor and manage unpaid customers on your Netcash account.
Total unpaids:
- Click on Services.
- Click on Debit orders from the dropdown menu.
- Click on Reports > Unpaid reports, Total unpaids.
- Select the From date and insert the Unpaid count.
- Click on Show report.
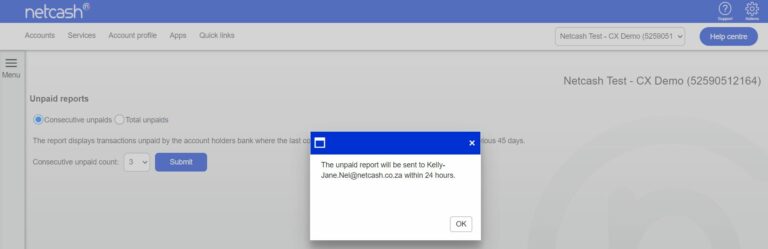
Consecutive unpaids:
- Click on Services.
- Click on Debit orders from the dropdown menu.
- Click on Reports > Consecutive unpaids.
- Select the Date range.
- Click on Submit.
Access notification settings
Netcash will notify you of changes to batch statuses and unpaid information of processed debit orders.
- Click on Account Profile.
- Click on My Space > Notifications.
- Click on Debit orders.
- Select the notifications that you require and Submit them.
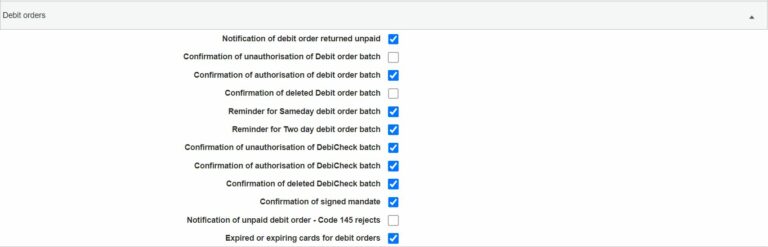
Note: Check that your email address is correct by clicking on My Space and Contact details. Edit details by clicking on the pencil to the left of your title.
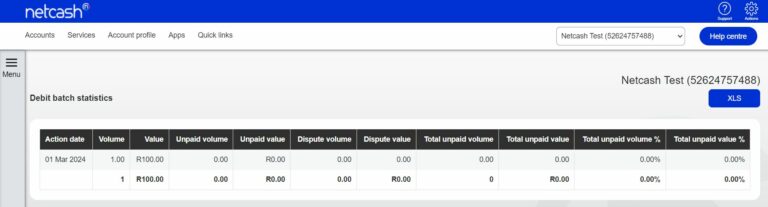
Understanding batch statistics and checking the Masterfile audit report
Batch statistics reflect the volume of transactions processed on your account and, using the percentage of unpaids, calculate the average unpaid percentage on your account. This will give you an idea of how successful your debit order collections are and will allow Netcash to calculate percentages required for Unpaid retention.
- Click on Services.
- Click on Debit orders from the dropdown menu.
- Click on Reports > Statistics.
The Masterfile audit report allows viewing which customers have been created, edited or duplicated in your Masterfile.
- Click on Services > Debit orders
- Click on Reports > Audit report.
- Select the date range.
- Select the Result type and click on Submit.
- A list of customers will be displayed that conform to your request, click on the Pencil to the left of the customers to view audit detail.
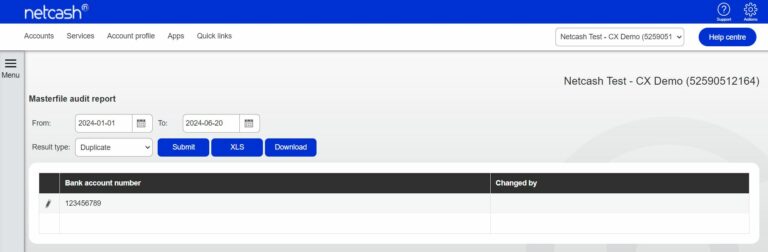
Note: If you are uploading debit batches the system is unable to determine which user made the change and consequently File upload will be displayed in the Changed by column.
Checking dates and viewing your statement
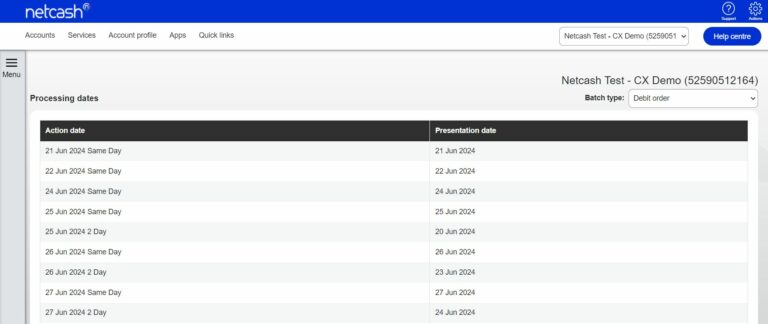
Processing date report
This report displays when a debit batch needs to be authorised for a particular action date. Same-day batches are to be authorised by 11 am on the action date and 2-day debit batches must be authorised by midnight 2 full working days prior to action date.
- Select Services.
- Click on Debit orders from the dropdown menu.
- Click on Reports > Processing dates.
- A list of processing dates will be displayed including action date and presentation date. This list is continually updated.
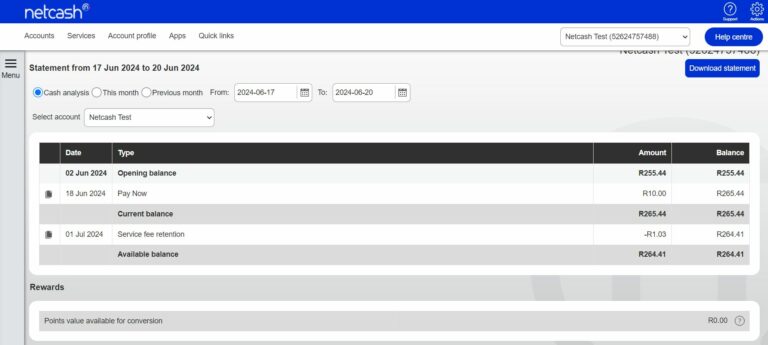
Quick steps to view your statement
- Select Services.
- Click on Account from the dropdown menu.
- Click on Reports > Statement
- Choose the statement you would like to view from the available options.
- Your statement is now displayed showing your available balance – this is the amount that can be released to your bank account.
- Click on the Printer to the left of the entry to get a breakdown of transactions.
Statement Download
- Click on Services > Account > Reports
- Click on Service Account from the dropdown menu.
- Click on Reports > Statement Download.
- Note the highlighted message – a detailed breakdown of all transactions.
- Choose the statement that you would like to view from the available options:
– Cash analysis
– This month
– Previous month
– Date Range
- Download the statement by clicking on the Download statement, CSV or XLS buttons.
How to release funds to your bank account
Paying money into your bank account is simple!
Request release funds
The release funds option allows you to release your available funds that is in your Netcash account into your bank account that is linked to your Netcash account
- Select Services
- Click on Account from the dropdown menu
- Click on Manage account > Request release funds
- Click on the Release funds button
- Your available balance is displayed
- Select Release all available funds or
- Release own amount
- Click on the Release funds button
- Funds are released to your bank account linked to your Netcash profile
Note: The amount available for release is finalised after 13h00 on the day of release. Funds will be available in your bank account the next day and will reflect the date on which the release was requested.
Authorisation cut-off time is 14h30 on the payment day. Valid payment dates are Monday to Friday (excluding public holidays)
Need more assistance?
Contact your Relationship Consultant on 0861 338 338 or email us on support@netcash.co.za
