Electronic mandate QSG
Our easy to use guide will get you up and running in no time!
Electronic mandates (E-mandates)
Our electronic mandate solution ensures that you obtain your customers’ authority to debit in a compliant, secure, and convenient manner.
Creating and sending and Electronic mandate (E-mandate)
1. Select Services > Debit orders > Manage debit orders > Electronic mandates.
2. Click on Add mandate, you may note that the process is very similar to creating a new Masterfile entry.
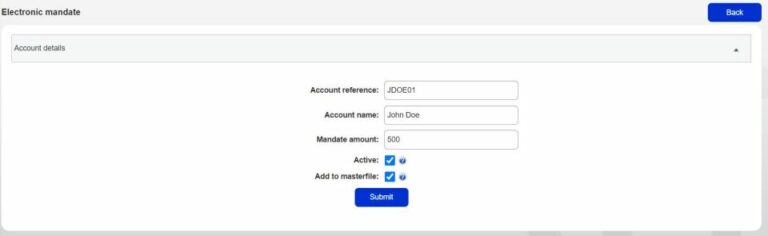
3. Insert Account Reference
4. Insert Account name.
5. Add the mandate amount (Debit amount)
6. Tick Active to activate the Masterfile.
7. Tick Add to masterfile to ensure a masterfile is created and updated for this customer once the mandate has been accepted.
8. Click on Submit.
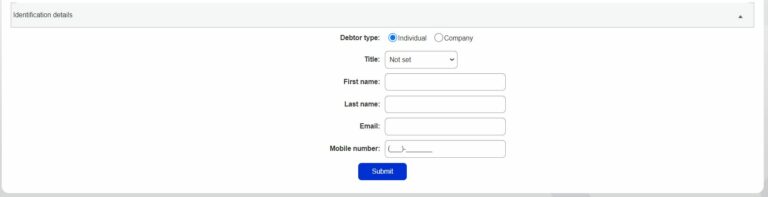
9. Insert Identification details – Insert the details of the individual who is to sign the mandate on behalf of the company/individual.
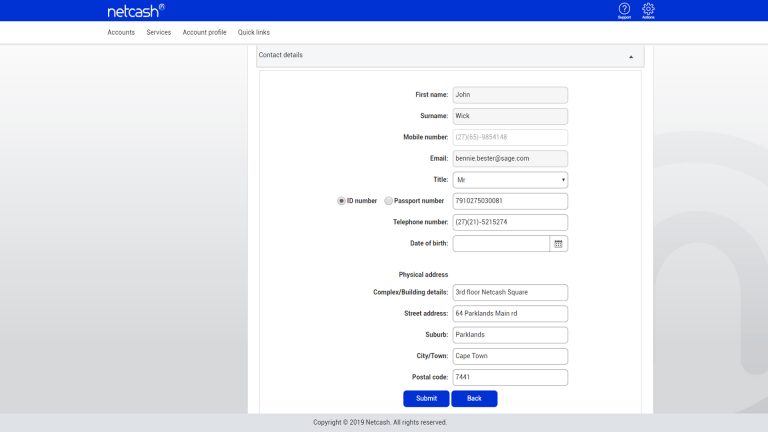
10. Bank account or Credit Card details can be inserted if you have them, alternatively, they can be inserted by your customer when authorising the mandate online.
11. Account grouping and Additional details are optional fields.
12. Click on the edit button if you would like to add any additional contact details for the customer. The customer can add their contact information when completing the electronic.
13. Complete the Electronic mandate tab.
Insert the following:
Debit frequency.(weekly, monthly ect)
Commencement month. The month the first collection will be debited.
Commencement Day: This allows your customer a choice of dates on which to debit the Bank account / Credit Card.
The customer contract reference number.
Authenticate as DebiCheck mandate: If your customer has chosen DebiCheck the emandate will include the Debicheck clauses and create an authentication in the Masterfile for the customer.
Select the DebiCheck template.
Note: a DebiCheck template must be created first before selecting a template. Navigate to Services > Debit Orders > service profiles > DebiCheck templates.
- Allow variable amounts if applicable.
Request AVS: If selected a bank account verification will be performed on the customers bank account, please ensure the customers ID number has been inserted in the contact details menu.
Additional clauses: specific clauses can be added to your mandate.The additional clause must be created first by selecting the additional clauses button a new clause can be created and saved. Once created it may be selected to add the the electronic mandate.
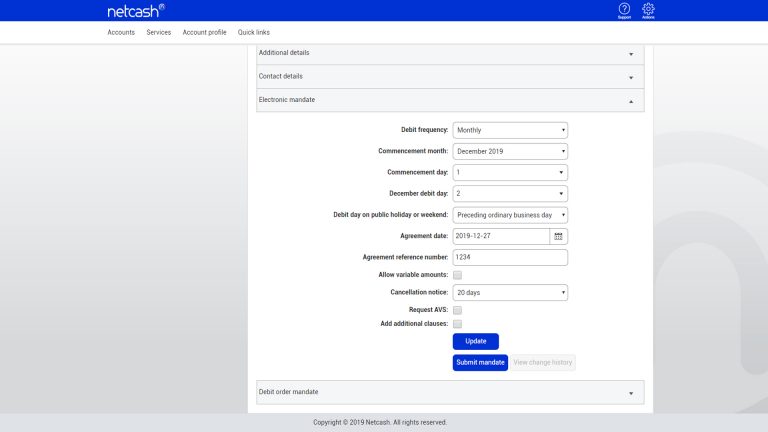
14. Click on update and then submit mandate.
15. A preview of the mandate will then be displayed, click on Send mandate when you are ready to send the mandate to your customer. Netcash will forward an email and SMS requesting your customer to sign the mandate electronically.
Customer signing process
1. Your customer will receive an email and/or SMS requesting them to sign the mandate electronically, by clicking on a link to the signing pages.
2. The first step is to insert. The OTP contained in the SMS/email followed by Submit.
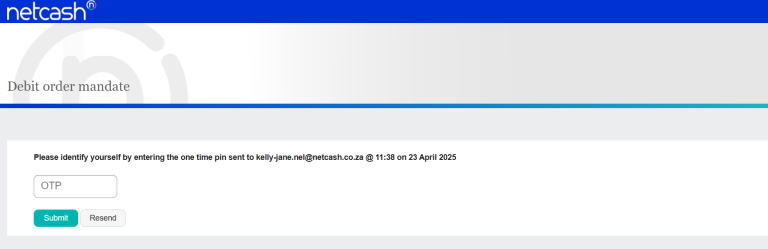
Note: Your customer has the option to resend the OPT for this electronic mandate by clicking on the resend button.
3. Complete the Contact Information details and submit. (If this information has been added to the mandate prior the customer can confirm and submit.)
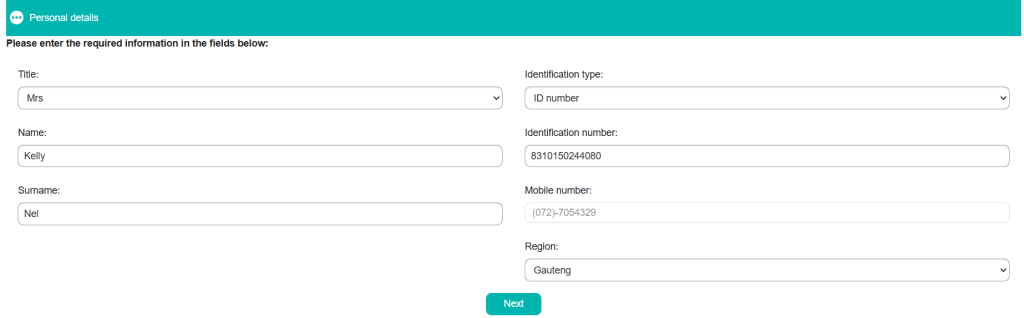
4. Choose a Bank account or Credit Card, insert details and select collection date on which debits are to Commence and run, thereafter. Click on Next. (If this information has been added to the mandate prior the customer can confirm and submit.)
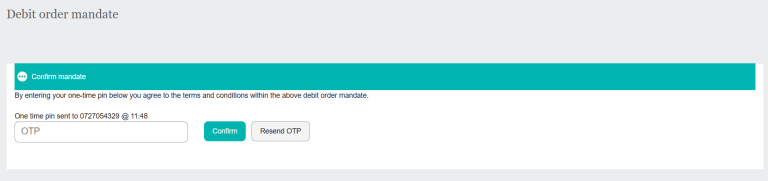
5. Review the mandate and note that additional clauses will appear at the bottom of the document.
6. The customer then has the choice to Sign or Decline the mandate.
7. Mandates are confirmed by inserting the OTP sent to the customer’s mobile number.
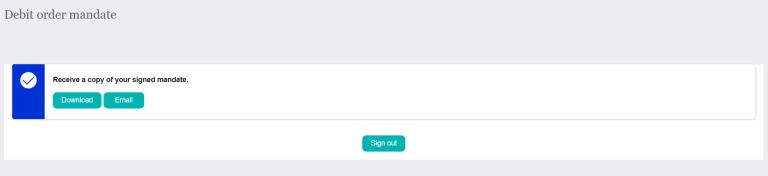
8. The completed mandate is thereafter available for download/email for your customer.
Masterfile updates
All mandates created will appear on the Electronic mandates page.

Only mandates that have been signed (Accepted status) will be automatically added to the Debit Order Masterfile.
Note: the add to Masterfile box must be ticked when creating the electronic mandate, alternatively, it can be updated to your Masterfile by selecting single or multiple mandates and clicking on the Update Masterfile button.
The Electronic mandates page will display the following:
All electronic mandates that have been created.
Account reference
Account name
ID validation
Bank account validation
AVS: The Tick box will be ticked if AVS was selected, and the reports can be viewed under Services> Risk Reports> Reports> AVS
Valid Status: Accepted, Awaiting authorisation, Awaiting signature, Captured or Declined
Select all: Mandates can be updated manually to the Masterfile by selecting the mandate. Updated status indicates the Masterfile has been updated.
Electronic mandates can be resent to the customer. The updated mandate will replace the existing mandate.
Click on the pencil icon to edit the electronic mandate if you require changes to the mandate.
Edit as required.
Select the electronic mandate field and select Resend mandate.
Note: The electronic mandate does not need to be edited in order to resend the mandate to the customer.
Additional clauses may be added to an Electronic mandate.
To create an additional clause, select the additional clauses button.
Select the Add clause button.
Insert a heading and description for the additional clause template.
Add your additional clause wording.
Select Submit.
Additional clause templates may be edited or deleted.
