Intercode Payroll
Index
- Paying employees via Netcash
- Netcash Salary Payments Service Key
- Payment Batch Reference
- Pre-Validation
- Obtain a pre-authorisation report
- Authorising a salary batch
- Obtain a post batch authorisation report
Our easy to use guide will get you up and running in no time!
Paying Employees via Netcash
Uploading a Salary Payments Batch to Netcash
Once you’ve processed, approved and closed your employees’ payslips for a particular pay period you can create a salary payments batch containing the net pay amounts of all employees who are paid via electronic fund transfers (EFT), then upload the payment batch to Netcash from where the actual payments will be processed.
To create and upload a salary payments batch to Netcash:
- In your intercode payroll navigate to the payroll section.
- Select Pay Periods at the top left of the Payroll window.
- Select the relevant Pay Group in the navigation pane to the left of the window, then select the relevant Pay Period.
- On the toolbar at the top of the Pay Periods window, click Pay via Netcash.
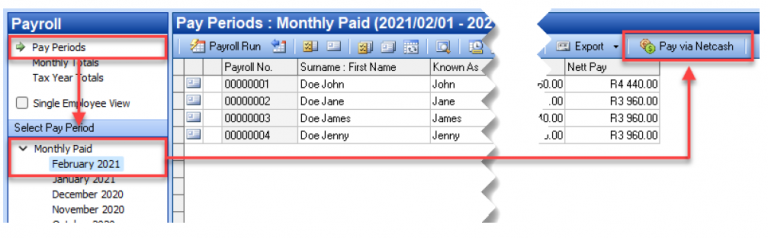
This will open the Upload Payment Batch to Netcash wizard which will guide you through the process of creating and uploading the payment batch.
Netcash Salary Payments Service Key
Each Netcash service (e.g. salary payments, creditor payments etc.) requires its own service key.
Service keys are globally unique identifiers consisting of 36 alpha-numeric characters in the format “xxxxxxxx-xxxx-xxxx-xxxx-xxxxxxxxxxxx”. Netcash will issue a separate service key for each service activated on a customer’s account. The service key prevents unauthorized access and identifies the account and the service to which transactions apply.
You can find your Netcash salary payments service key by logging in to your Netcash account and selecting Account Profile > NetConnector > Salary Payments.
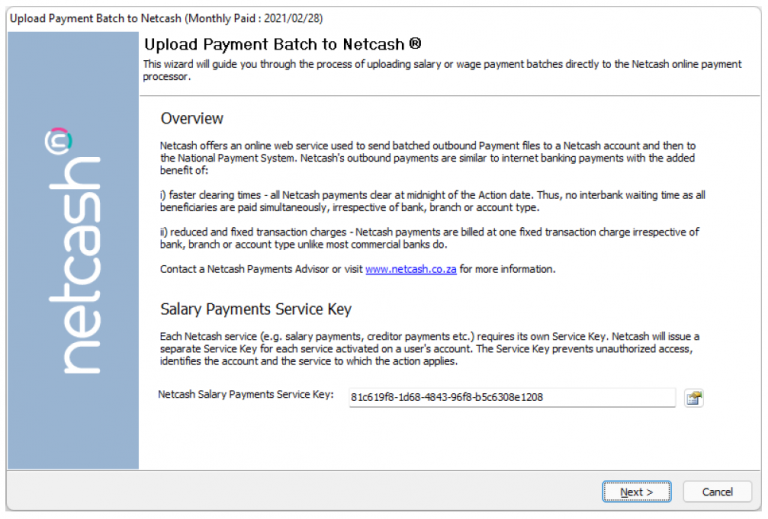
Enter your Netcash salary payments service key into the field at the bottom of the first page of the wizard, then click Next to continue.
Hint: In order to limit typing errors when entering your salary payments service key it is recommended that you copy and paste the service key from your Netcash account into this field.
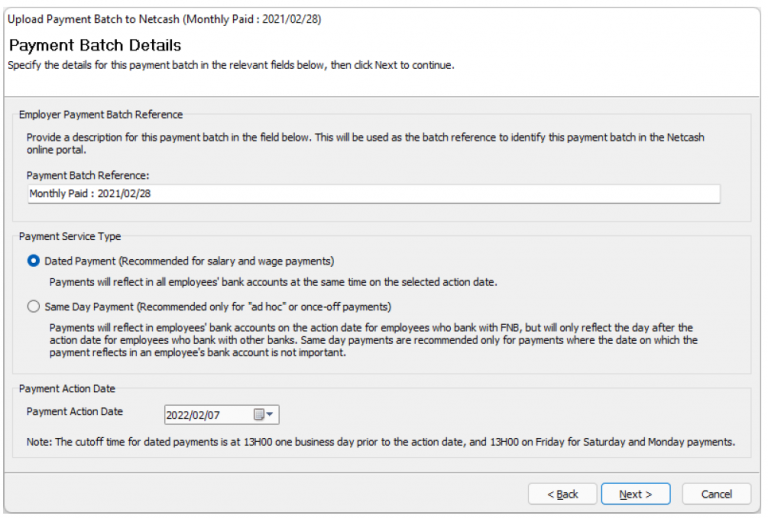
Payment Batch Reference
Enter a description for the payment batch in the relevant field. This batch reference will be used mainly to identify this batch in the Netcash payment batch upload reports which can be printed from within the Netcash online portal. By default, the Payment Batch Reference will be set to the pay group name and the pay period ending date but can be changed if required.
Payment Action Date
Select the date on which the salary payment batch must be processed. Valid processing days for dated payments are Monday to Saturday (excluding public holidays), and same-day payments are Monday to Friday (excluding public holidays). Regardless of the payment service type selected, the payment action date may never fall on a Sunday.
Once all the relevant fields have been completed, click Next to continue.
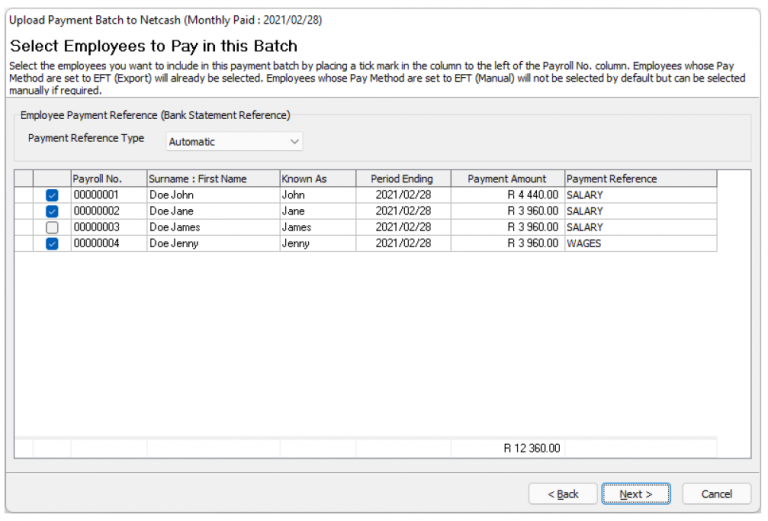
On the next page, select the employees you want to include in this payment batch by placing a tick mark in the column to the left of the relevant employees’ payroll numbers. Employees who are “ticked” will be included in the payment batch, and employees who are not “ticked” will not. When you first enter this page, employees whose Payment Method is set to EFT: Export in the relevant pay period will already be selected, but employees whose Payment Method is set to 6V: nana/ will not. Employees who have not been selected by default can still be selected manually (as described earlier), and employees who were selected by default can likewise be unselected if required.
Tip: You can quickly select or unselect all employees in the list by right-clicking on any employee and then selecting either Select All or Unselect All from the resulting pop-up menu.
Note: Only employees from the selected pay group whose Payment Method is set to either EFT: Manual or EFT: Export in the relevant pay period will be reflected in this window. Employees whose Payment method is set to either Cash or Cheque in the relevant pay period will not be reflected in this window at all. If any such employees need to be included in the payment batch you will first need to close the wizard and change those employees’ Payment Method in the relevant pay period to either EFT: Manual or EFT: Export, and then try again.
Payment Reference Type
The Payment Reference column indicates the payment reference that will appear on the employee’s bank statement for this transaction. The Payment Reference Type drop-down at the top left of the window controls how each employee’s payment reference is determined.
The following options are available:
Automatic: Each employee’s payment reference is assigned automatically based on whether the employee is a salaried employee or a wage worker unless a custom payment reference has been defined for the employee in the Employee Setup Wizard, in which case that custom reference will be
used instead.
Custom: The user can specify a custom payment reference that will be used for all employees in this payment batch, excluding employees for whom custom payment references have already been defined in the Employee Setup Wizard.
Custom All: The user can specify a custom payment reference that will be used for all employees in this payment batch, including employees for whom custom payment references have already been defined in the Employee Setup Wizard, but excluding employees whose salaries or wages are paid into
prepaid debit cards such as Reload, Mukuru or IMB where the payment reference must always be the employee’s debit card number.
You can also edit the payment references of individual employees manually in this window simply by clicking on the Payment Reference field for the relevant employee and manually entering a custom reference for that employee only.

Tip: Payment references that have been edited manually will be displayed in blue. To reset a modified payment reference back to the default payment reference for the relevant employee, right-click on the modified payment reference and select Reset Reference from the resulting pop-up menu.
Once you have selected all the employees you want to include in this payment batch and have checked (or set) the relevant payment references, click Next to continue.
Pre-Validation
As soon as you click Next at the bottom of the employee selection page, the payment information of all the employees who have been included in the batch will be validated by Intercode Payroll to ensure that the information is complete and correct before it is uploaded to Netcash. If the validation process fails you will be presented with an error report listing the relevant employees and the nature of the error(s). You will then need to close this wizard, correct the errors and then start the payment batch upload process again.
Alternatively, if one or more errors cannot be corrected at the present time, you can unselect the “problem” employees to exclude them from the payment batch, allowing you to proceed with the payment batch for the remaining employees. Keep in mind however that the excluded employee will then not form part of the current payment batch, so will either have to be included in a future payment batch or will have to pay manually.
If the payment information of the selected employees passes the validation process however you will automatically be taken to the next page where you will be able to upload the payment batch to
Netcash.
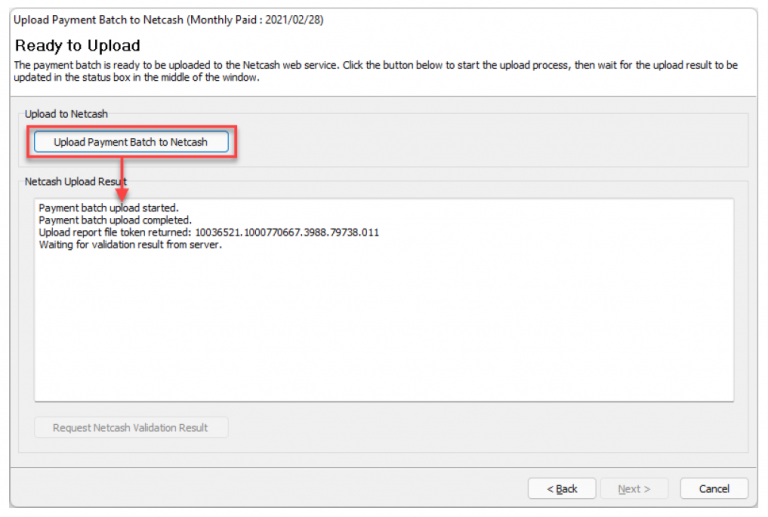
Click the Upload Payment Batch to Netcash button at the top of the page to start the batch upload process. As soon as you’ve clicked the button you will see the batch upload progress being updated in the middle of the window. The first step in this process is to upload the payment batch to the Netcash web service.
In the unlikely event that the upload process fails, you will see a message in the middle of the window indicating that the upload has failed and also providing some information as to what might have caused the upload to fail.
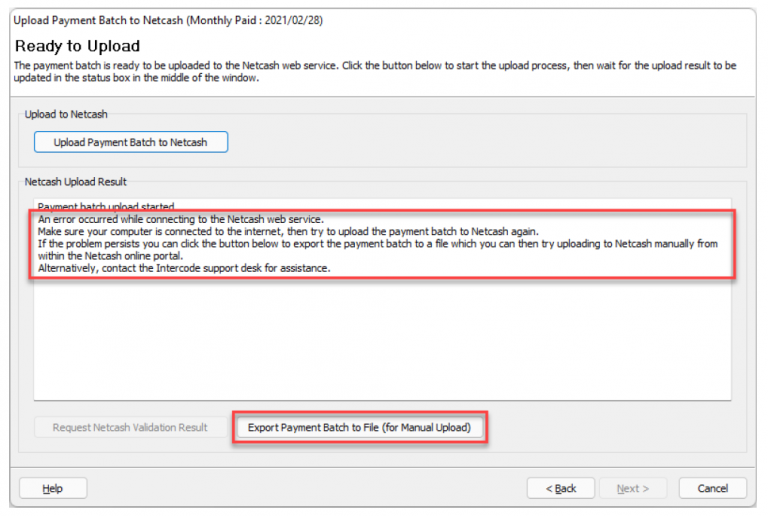
Possible reasons for the upload to fail might be that your computer is not connected to the internet or that the employer’s salary payments service key was entered incorrectly and therefore failed authentication on the Netcash server. If possible, correct the error and then try to upload the payment batch to Netcash again. However, if for any reason the error cannot be corrected, you will also notice that a new Export Payment Batch to Fi/e button has appeared at the bottom of the window. Clicking this button will allow you to save the payment batch to an external file instead, which can then be uploaded to Netcash manually from within the Netcash online portal.
This feature is a fallback that will allow you to still get your payment batch processed by Netcash until such time as the problem with the direct upload can be resolved. This feature can also be a valuable resource for Intercode or Netcash’s support staff who can examine the content of the file to help determine why the direct upload might have failed.
If the upload process is successfully completed however you will see an Upload Report File Token (a long list of numbers) being returned from the server. This indicates that the Netcash web service has successfully received the payment batch and is currently validating the information in the payment batch. Intercode Payroll will then automatically start polling the web service for a validation result using the file token returned in the previous step. Depending on the size of the payment batch it can take a while for the Netcash web service to validate the payment batch information and produce a validation result, so Intercode Payroll will keep polling the web service every two seconds until a validation result is returned or until ten seconds have elapsed without a result, at which point the polling process will time out.
Note: If the process times out you will see the Request Netcash Validation Result button at the bottom of the window is enabled. This will allow you to keep polling the web service manually every few seconds until a result is returned, or until the process is cancelled by closing the wizard.
Once a validation result is received from the Netcash web service:
if the validation process was unsuccessful you will see a message in the middle of the window informing you that the validation failed, and the Request Netcash Validation Result button will become enabled. Click this button then retrieve the validation result report from Netcash which will indicate the exact nature of the errors encountered. You will need to correct the relevant errors and then start the payment batch upload process again.
if the validation process was successful however you will automatically be taken to the next page where you will be able to print a payment batch summary.

Once you reach this page your salaries payment batch will already have been successfully uploaded to Netcash, and all further interaction with the payment batch from this point forward will be done inside the Netcash online portal.
Click Print Payment Batch Summary to print a summary of the payment batch details for this payment batch.

IMPORTANT: Once a payment batch has been successfully uploaded to Netcash the payment batch must still be authorised in the Netcash online portal before the batch can be processed by Netcash. Remember to log in to your Netcash account to authorise the batch in order for the payments to be processed.
Select your preferred format to download your report.
The batch will automatically start downloading and save in your default downloads folder.
Obtain a pre-authorisation report
- Select Services.
- Click on Payments from the dropdown menu.
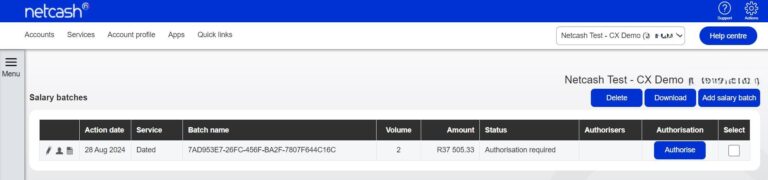
- Click on Salaries > Salary batches.
- The list of salary batches will now be displayed.
- To download your pre-authorisation report, click on Edit Clients on the left side of the salary batch that you require the report.
- To download your salary batch report, click on the Download button above the right side of the table.
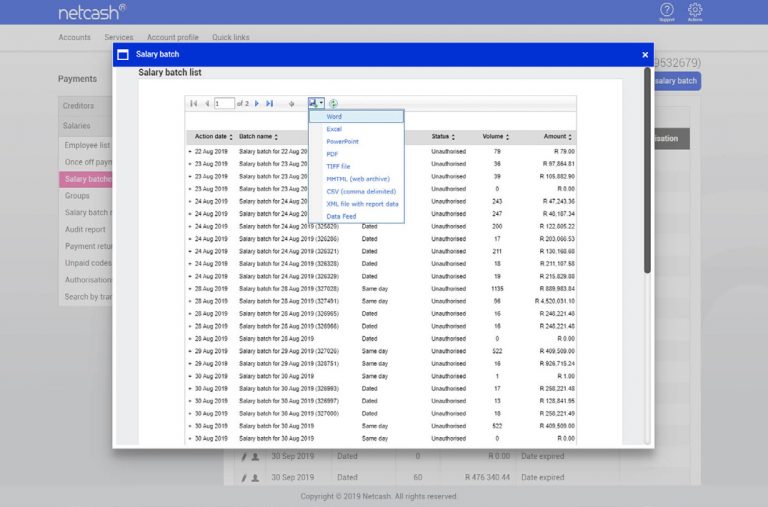
- Your salary batch report will be displayed on the screen. Click on the Export icon and select the preferred format to download your report.
- The batch will automatically start downloading and save in your default downloads folder.
Authorising a salary batch
- Select Services.
- Select Payments from the dropdown menu.
- Click on Salaries > Salary batches.
- The list of salary batches will be displayed.

- Click the Authorise button next to the batch that you would like to process.
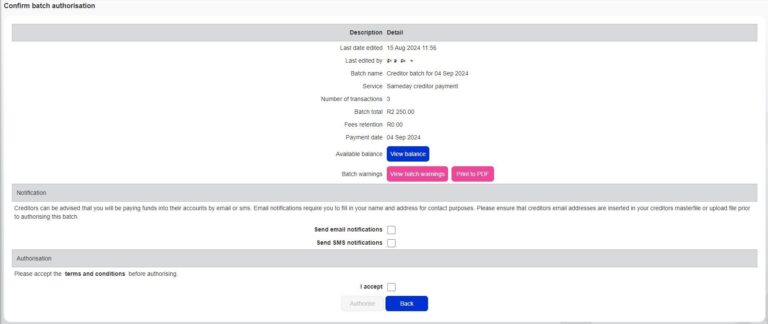
- The confirm batch authorisation screen is displayed. This is a summary of the salary batch including charges,
notifications and a choice of funding options:- Batch warnings -A batch warning button displayed in pink indicates warnings in the batch. Batch warnings will display info in the batch such as duplicate bank accounts and account details changed. You can choose to make corrections or proceed to authorise the batch without amendments.
- Use the available balance if there is sufficient credit in your Netcash account.
- Transfer funds if you need to fund the Netcash clearing account for payment.
- Read and accept the terms and conditions, then select Authorise.
- Should you select to pay using the Available balance option you will then be re-directed to the Confirm batch authorisations screen.
- Insert the One Time Pin (OTP) sent to your cell number or Google authenticator pin.
- Click OK.
- Your salary batch is now authorised and will be scheduled to run on the selected date.
- If you require additional authorises, the batch will be awaiting further authorisation – please inform the additional authorisers of this.
- If you are paying using the Transfer funds option, you will be prompted to insert the following information:
- The date when the transfer will be made.
- The Netcash account you will be transferring to.
- The amount to be transferred.
- The extra fields are optional for reconciliation purposes.
- Select Next.
- Click on Print Report in order to obtain details of the Netcash clearing that you need to fund. Please ensure your transfer has the correct reference.
- Click Authorise to confirm your bank transfer.
- Insert the One Time Pin (OTP) sent to your cell number or Google authenticator pin.
- Your Salary Batch is now authorised and will be scheduled to run on the selected date.
- If you require additional authorises, the batch will be awaiting further authorisation – please inform the additional authorisers of this.
One Time Pins are session-based, which means that as long as you are logged in to your Netcash account, you can use the same OTP to authorise. Where multiple authorisations are required, only the first authoriser needs to insert the OTP.
Obtain a post-batch authorisation report
- To obtain your post-batch authorisation report click on Services.
- Click on Payments from the dropdown menu.
- Click on Salaries > Salary batch reports.
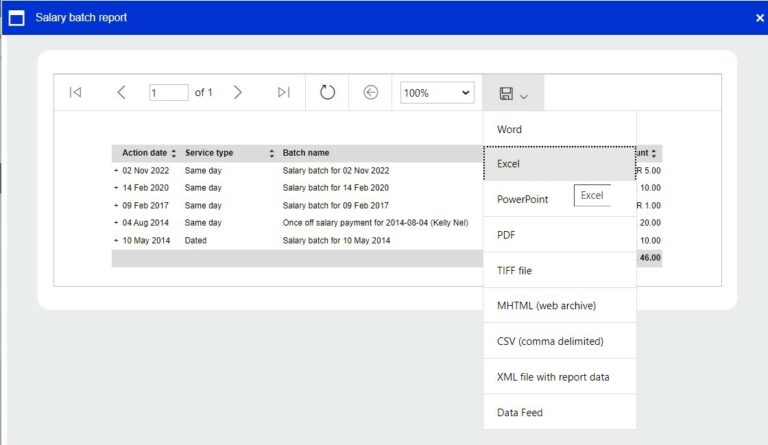
The list of salary batches will now be displayed. - To download your Post-Authorisation Report, click on the printer on the left side of the Salary Batch report
- Click on the Export icon.

- Select your preferred format to download your report.
- The batch will automatically start downloading and save in your default downloads folder.
Need more assistance?
Contact your Relationship Consultant on 0861 338 338 or email us on support@netcash.co.za
