WooCommerce Payment Gateway Integration
You will need:
- An active Netcash account
- The Netcash Pay Now service activated
- Netcash Pay Now Service key
- WordPress admin login credentials with WooCommerce installed
- Video demos
Setting up the Netconnector service key
To connect your Netcash PayNow Payment Gateway to your WooCommerce account, you will need to generate a unique service key and connect this to your WooCommerce payment settings.
The first step will be to generate the service from within your Netcash account
- Log into your Netcash account
- Click on Account Profile on the top menu.
- Select Netconnector from the left side menu.
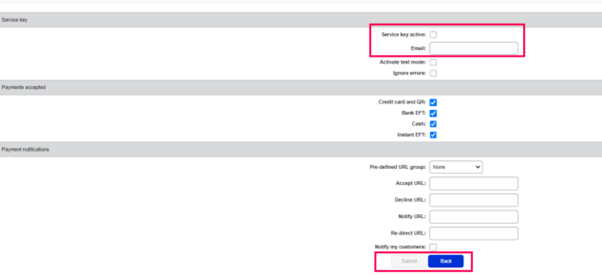
- Click on the Pay Now menu.
- Activate the Pay Now service.
- Insert your email address.
- Click “Save” and then copy your Pay Now Service Key by clicking on the clipboard icon.
Downloading and installing the ‘Netcash WooCommerce Payment Gateway’ Plugin.
- Login to your WordPress website as admin (wp-admin folder). You can either download the plugin as a .ZIP file or you can install it directly from the Plugin directory within your site.
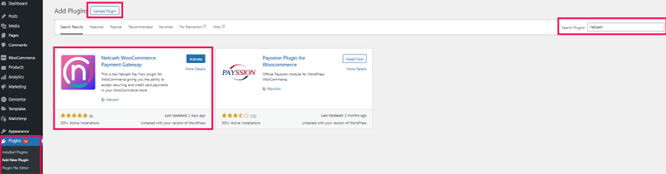
*See below on where you can download the plugin from our trusted sources. - If you have downloaded the .ZIP file, Click “Plugins” / “Upload”, “Browse”, and select the downloaded file. Click ‘Install’ and Activate the Plugin.
- If you are searching for the plugin directly from the WordPress plugin directory, search for ‘Netcash WooCommerce Payment Gateway’ and click on ‘Install’. Allow for a few seconds and then the button will change to allow you to click ‘Activate’.
- Once the plugin is installed, you will need to configure the WooCommerce payment settings and set up your postback URLs.
Note: Credit card payments
Netcash accepts Visa and Mastercard by default. American Express and Diners Club international are available on request as these cards incur additional fees. To find out more about the fees or to activate American Express and or Diners Club international please contact your Account Manager.
Follow this guide or watch the videos for step by step instructions on setting up your Netcash Payment Gateway on WooCommerce.
Adding WooCommerce to your WordPress site
Setting up the Netcash Payment Gateway in WooCommerce
Setting Up Your WooCommerce Payment Settings
From within your WordPress dashboard, you will need to connect your Netcash Merchant account details to your WooCommerce settings.
You will need your Netcash account number and your Pay Now service key (found in section 1 above).
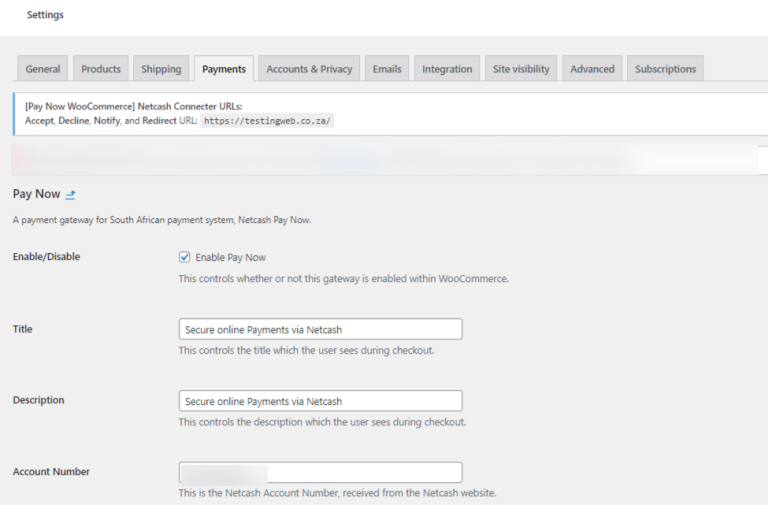
- Access your WordPress Dashboard and navigate to WooCommerce and click on Settings.
- Move from the ‘General’ tab to ‘Payments’
- Make sure to enable Pay Now by clicking on the checkbox.
- Insert your Account Number and Pay Now Service Key into the required fields.
- Click Save Changes.
Connecting Your Postback URLs in your Netcash Account
From within your WordPress dashboard, under WooCommerce payment settings, you will find pre-created URLs, namely the Active, Decline and Redirect as well as the Notify URL.
- Copy these URLs and add them to your Netconnector settings.
- Navigate to your Netcash account >Netconnector > Pay Now and paste the URLs into the relevant fields:
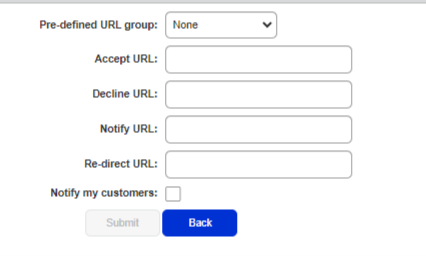
3. If you are using the Netcash Payment Plugin version 4.1.0 or higher, please note that there is only one URL for the Accept, Decline, Notify and Re-Direct URLs.
Ensure the Notify URL is correct.
Running subscriptions on WooCommerce
If you’d like to sell subscription products online, you can use your Netcash Payment Gateway with the WooCommerce Subscriptions plugin. Follow the video guides below to find out how to:
