Octiv
Our easy to use guide will get you up and running in no time!
Debit Orders
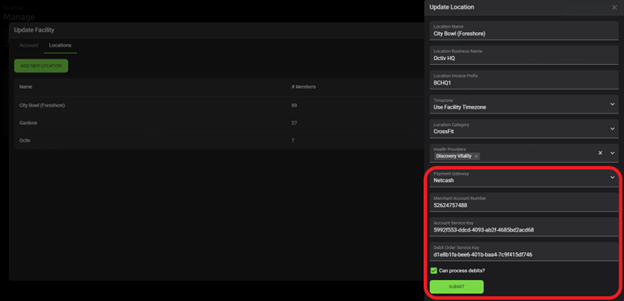
Once an Octiv client has set up their Netcash account, Octiv will need the client’s Netcash keys in order to create the webhook.
- Netcash Account Number:
- Account Service Key:
- Debit Order Service Key:
These keys have to be shared with the Octiv team as the webhook is created in the backend.
The keys are then added to the client’s Octiv profile in the backend. This can only be done by an Octiv Team member.
After we have added the webhook keys we inform the Octiv client about the changes they have to implement on their Netcash account as well as how to run a Debit Order via Octiv.
The Netcash account manager must please double-check that the below changes have been added to the client’s Netcash account.
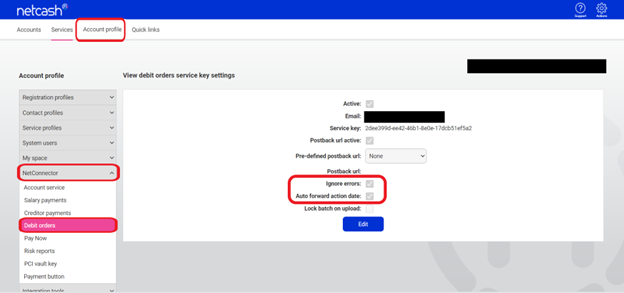
Please go into the client’s Netcash account and enable the following settings:
Netcash Login > Account Profile > Net Connector > Debit orders > Edit
Please select:
- Ignore error
- Auto Forward Date
* Ensure that your email address is correct ( this is the address where you will receive your error reports)
This will ensure that if there is an erroneous member that the batch will still be processed. Should the batch fall on a Sunday or Public holiday the batch will also be processed on the next available day.

Below please see the email sent to the Octiv client once the webhook has been added in the backend of their profile.
Hi FACILITY NAME,
We have created your webhook.
Please go into your Netcash account and enable the following settings:
Netcash Login > Account Profile > Net Connector > Debit orders > Edit
Please select:
- Ignore error
- Auto Forward Date
* Ensure that your email address is correct ( this is the address where you will receive your error reports)
This will ensure that if there is an erroneous member that the batch will still be processed. Should the batch fall on a Sunday or Public holiday the batch will also be processed on the next available day
Please see the below instructions on how to manage your debit orders. Should you need assistance please contact us.
If you would like to set up an accounts training session please book by clicking on the below link: https://meetings.hubspot.com/adam1145/45
For now please read the below:
Managing your debit batch
1. Adding new members to debit orders
For New members going onto direct debit, you need to set the member to “debit order” payment type and select the date. (it is best to select 1-3 payment dates otherwise you will be receiving revenue on various dates. Also, its good to plan when revenue is coming in so that you can cover your overheads)
From here you will also need to collect all your member’s billing details and start adding them to the Debit Order payment type as mentioned below, this will be a single action for each member. If have a bulk list of these members, please email onboarding@octivfitness.com & ask us to assist with the bulk upload of members’ billing details.
Members > manage packages > filter payment type from “cash/eft” to Debit order > add in the account details > save.
2. Managing your debit order invoices
In Accounts > Debit batches:
You can get a full view of your Past and Upcoming debit batches under this page by selecting the correct location and run date at the top of the screen. From this view, you can also directly edit the invoices & Add Items for payment per member. It is advised that you make amendments under the invoice tab first so that the finalised Debit order batch displays correctly.
You can make these amendments provided that the batch has NOT YET been submitted. Should you need to edit the invoice after the batch has been submitted you will have to edit it under the invoice page in Octiv and in your Netcash account before authorisation.
In Accounts > invoices
It is suggested that you custom filter your debit order invoices to ensure you are working on all of them e.g. if the generation date is set to the 20th of each month and the payment due date is set to the 1st then custom filter in the following manner:
- Change the filter from “All invoices” to “Debit order invoices”
- Then, change the filter from “Current month” to “Custom”
- Fill in the dates as specified.
- From here you can edit generated invoices.
3. Check your debit batch
In Accounts > Debit batches:
After your invoices are finalised you need to check that:
all your invoices are the correct amount
all the members that are meant to be on the batch are on the batch
4. Submission into your Netcash account
Your batch will be automatically submitted into your Netcash account 5 days before the debit run date.
- On submission you will receive an error report via email from Netcash, if your batch is “successful with errors” please email this through to us so that we can assist you in finding the erroneous member and advise further.
- You then need to check that the amount in your Netcash batch matches the amount in your Octiv debit run.
- Once you are happy you can authorise the batch. You need to authorise the batch 3 days before the debit run date.
Authorising your batch in Netcash:
- Log into your Netcash Account
- Go to “Services”
- Go to Debit Orders > Manage debit orders > Authorise your batch
5. Reconcilement of payments
Once the Debit Order has run, your invoices for your members will be automatically marked as paid if the transaction was successful or unpaid if the transaction was not successful.
Things to remember Netcash:
5 days before the run date, the debit date the batch is automatically sent to Netcash for pre-authorisation
You will then need to log in to your Netcash account to authorise the batch. Cut off for authorisation of a two-day batch is 3 days before the run date.
If you have added a member close to the debit order date, e.g. from the 22nd onwards, there is a likelihood that the invoice will not be generated for the next run – > please check this.
If an invoice needs to be edited after it has been submitted, you need to do this in your Netcash account as well as in the Octiv invoices, before the batch is authorised.
If invoices need to be added to the debit batch, after it has been submitted, this needs to be done through your Netcash account or request that the customer pays via cash/EFT.
Befcash error report. Errors will be in the form of incorrect billing details. Please forward the error report to Octiv Support support@octivfitness.com so that we can identify who the member is.
Once the amendment is made, please let Octiv support know so that we can resubmit the amended batch (the old batch can then be deleted and the latest batch authorised).
Pay Now ONLY
Octiv clients have the option to only use Pay Now without Debit orders.
In order for them to activate the Pay Now function on their Octiv account they will need the below keys:
Netcash account number:
- Account service key:
- Pay Now key:
These keys have to be shared with the Octiv team as the webhook is created in the backend.
The keys are then added to the client’s Octiv profile in the backend. This can only be done by an Octiv Team member.
After we have added the webhook keys we inform the Octiv client about the changes they have to implement on their Netcash account as well as how to run a Debit Order via Octiv.
The Netcash account manager must please double-check that the below changes have been added to the client’s Netcash account.
Instruction on how to set up a Pay Now account in Octiv
This is shared with each client once we have added the Pay Now keys for them.
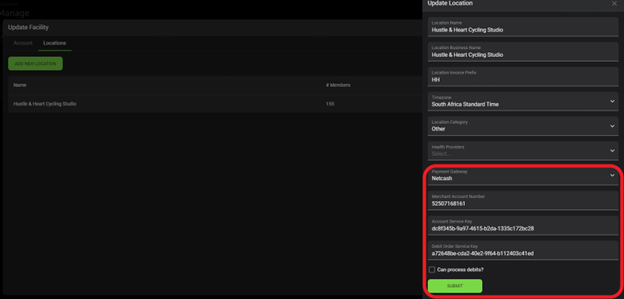
1.1 Add Pay Now Keys to Octiv
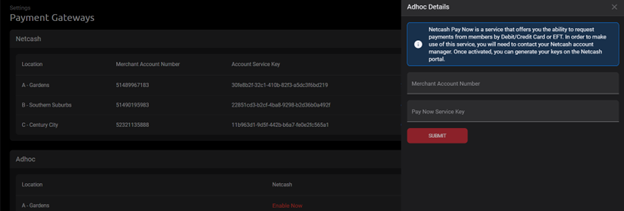
In Octiv go to Settings, find “Payment Gateway Settings” > Under Adhoc Payments > click enable now and add your Netcash Account Number and Pa yNow key into the specific fields to activate Pay Now > submit

Note: If you have more than one location make sure to allocate the location-specific keys to the correct location.
1.2 Adjust and set-up Pay Now in Netcash (Netcash to assist clients)
Once the Pay Now keys have been added to your Octiv account please log into your Netcash account and enable the following settings:
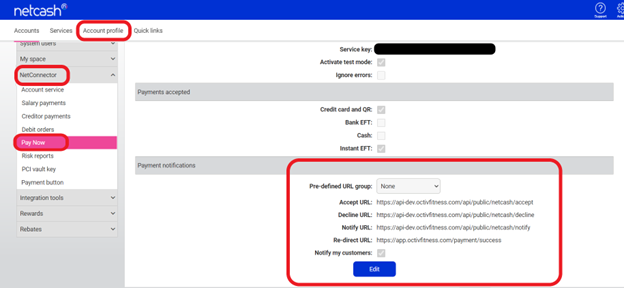
Netcash Login > Account Profile > Net Connector > Pay Now > Payment Notification
Predefined URL Group – None
Add the below links into the necessary tabs (these links Do NEVER change)
Accept URL: https://api.octivfitness.com/api/public/netcash/accept
Decline URL: https://api.octivfitness.com/api/public/netcash/decline
Notify URL: https://api.octivfitness.com/api/public/netcash/notify
Redirect URL:https://app.octivfitness.com/payment/success
Please select: Notify My Customers

If these URLs are NOT in place, invoices will not be updated when payments go through.
The option to receive notifications once successful payments are made can be activated
Not all customers want to receive a notification every time there is a successful transaction.
Account Profile > System Users > Notifications > Pay Now > Tick Pay Now recon payment advice to the merchant and Submit.

How to use Pay Now
Pay Now can be used to request online payments to be paid via card by sending invoices to a member, lead, or non-member.
Members can buy top-ups as well as full packages via the app. It will then immediately ask them to pay the top-ups via Pay Now.
If using the Octiv widgets. For limited packages, members will pay immediately via Pay Now as well as Drop-ins.
2.1 How to request a payment via Pay Now
Generate an invoice if one has not been created. This can be a members invoice, a leads invoice or an invoice to a non-member via POS
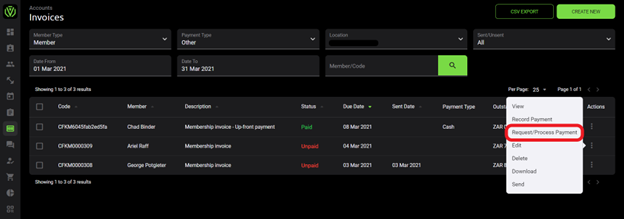
Go to Accounts > Invoices > Search for the invoice you would like to bill
Click on the action button next to the invoice > request/process payment

A box will then pop up asking how you would like to process the payment:
Processing immediate payment will open the Pay Now payment window immediately for your customer to pay

Should you wish to send the customer the link to pay later, do NOT select the “process immediate payment” option. Instead, just select Netcash
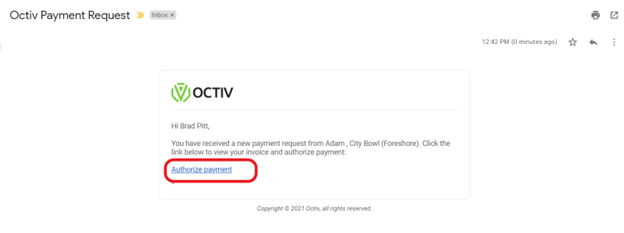
The member will then receive an email with a link to make a payment
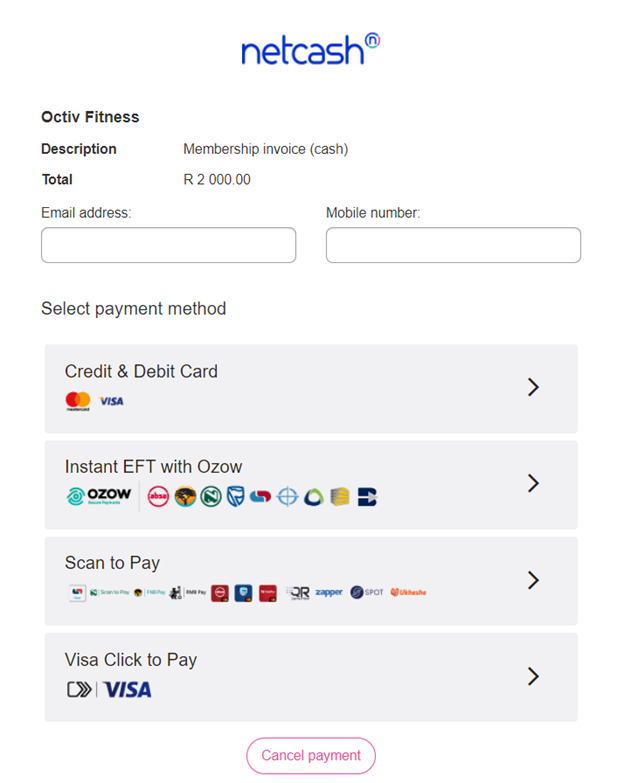
The member selects Authorise payment > the link will then take the member to the above Octiv and Netcash windows to pay their invoice

2.2 Topping up sessions through the app
2.2.1 Add top-up prices to packages
This functionality only works for packages that have a top-up price allocated.
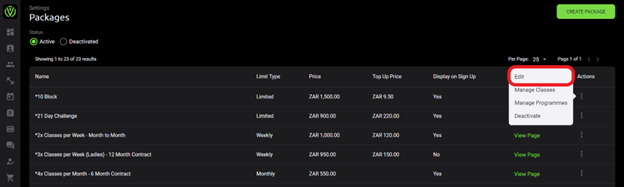
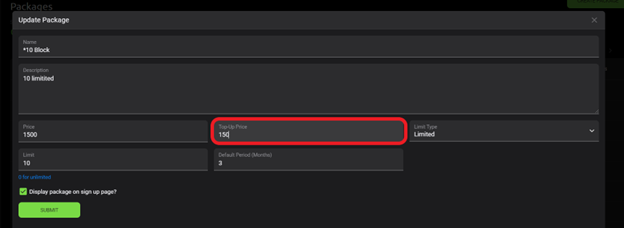
Go to your packages and set up a top-up price * this price is PER session – you can not top-up on an entire membership
Settings > packages > click on the action button next to the package > Edit > insert top-up price > save.


2.2.2 How Members purchase top-ups via their Ocriv Profile when Integrated with Pay Now
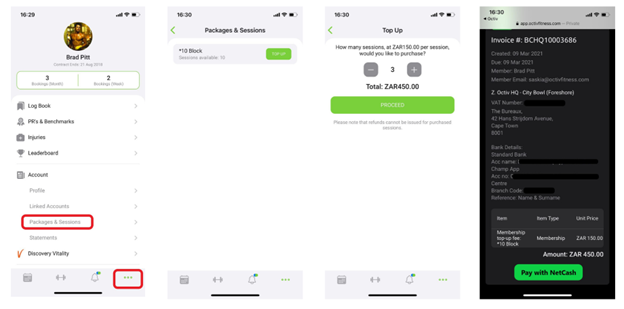
Member logins into the app
Click the … icon in the left bottom menu bar > Packages & Sessions
Click on Top Up and Insert the number of sessions they would like to purchase > proceed
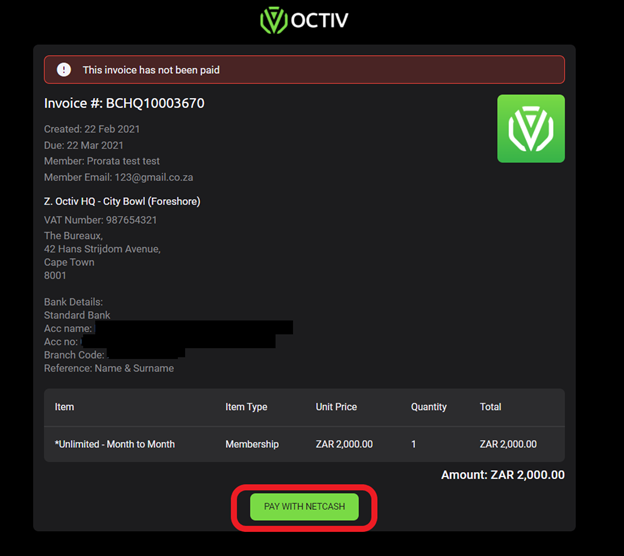
The app will then open the invoice on the screen where the member will select Pay with Netcash
On the Octiv platform:
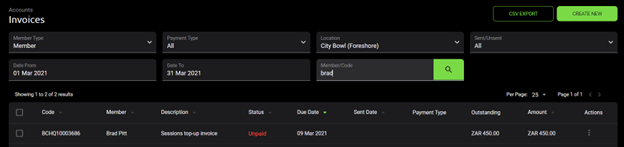
The system will automatically generate an invoice for the app top-up under accounts > invoices
This invoice will recon to Paid once the members’ payment was successful
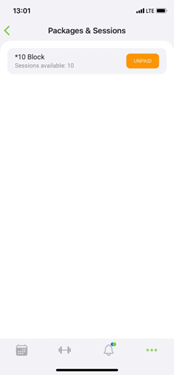
Only once the payment has been successful will the sessions be released
If the payment of a member is unsuccessful the invoice can be resent to the member via request/ process payment.
The member also has the option in the app to pay the invoice at a later stage.
The top-up invoice however can also be manually recorded if wanted. Here the sessions will be released once the invoice has been recorded as paid
2.3 How Members purchase the limited package via their Octiv profile when integrated with Pay Now
For the first time ever, members now have the option to buy packages via the app. We believe that this will aid retention by having a frictionless way to upgrade or buy a new package on-demand, without the need to have back-and-forth communication about it.
This option is only available to enabled packages.
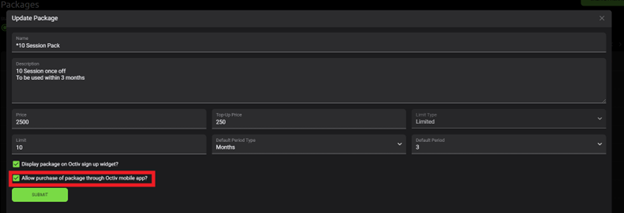
Go to Settings > Packages > Click on the Actions button next to the package > Edit > Select or Deselect “Allow purchase of package through Octiv mobile app?”
Payment methods that are available within the app are the same payment methods selected for new sign-ups in your sign-up settings.
Once a package is purchased through the app the studio will be notified by email. This email includes the member’s name, package purchased as well as payment type.
In the app menu > Click on Packages & Sessions > Sign up for new package > Select package > Choose payment method > Accept Contract & Waiver > Sign up
For Limited packages integrated with Pay Now:
If the facility is integrated with Pay Now the member will be asked to pay immediately via credit card. Once the payment is successful the sessions are released.
The invoice is automatically created, sent and marked as paid on the Octiv platform.
2.4 How Leads purchase drop-ins via the Schedule widget Octiv profile when integrated with Pay Now
See Drop-ins https://7147743.hs-sites.com/knowledge/drop-ins
Pay Now add-on with Debit Order
Octiv clients have the option to add the Pay Now option to their Debit Orders.
In order for them to activate the Pay Now function on their Octiv account they will need the below keys:
- Netcash account number
- Pay Now key
These keys have to be shared with the Octiv team in order to assist the client with the webhook.
After we have added the webhook keys we inform the Ocitv client about the changes they have to implement on their Netcash account as well as how to run a Debit Order via Octiv.
The Netcash account manager must please double-check that the below changes have been added to the client’s Netcash account.
Instruction on how to set up a Pay Now account in Ocitv (This is shared with each client once we have added the Pay Now keys for them)
1.1 Add Pay Now Keys to Octiv
In Octiv go to Settings, find “Payment Gateway Settings” > Under Adhoc Payments > click enable now and add your Netcash Account Number and Pay Now key into the specific fields to activate Pay Now > submit
Invalid keys won’t be accepted.
Note: If you have more than one location make sure to allocate the location-specific keys to the correct location.
1.2 Adjust and set up Pay Now in Netcash (Netcash to assist clients)
Once the Pay Now keys have been added to your Octiv account please log into your Netcash account and enable the following settings:
Netcash Login > Account Profile > Net Connector > Pay Now > Payment Notification
Predefined URL Group – None
Add the below links into the necessary tabs (these links Do NEVER change)
- Accept URL: https://api.octivfitness.com/api/public/netcash/accept
- Decline URL: https://api.octivfitness.com/api/public/netcash/decline
- Notify URL: https://api.octivfitness.com/api/public/netcash/notify
- Redirect URL: https://app.octivfitness.com/payment/success
Please select: Notify My Customers
If these URLs are NOT in place, invoices will not be updated when payments go through.
The option to receive notifications once successful payments are made can be activated
Not all customers want to receive a notification every time there is a successful transaction.
Account Profile > System Users > Notifications > Pay Now > Tick Pay Now recon payment advice to merchant and Submit.

1. How to use Pay Now
Pay Now can be used to request online payments to be paid via card by sending invoices to a member, lead or non-member.
Members can buy top-ups as well as full packages via the app. It will then immediately ask them to pay the top-ups via Pay Now.
If using the Octiv widgets. For limited packages, members will pay immediately via Pay Now as well as Drop-ins.
2.1 How to request a payment via Pay Now
Generate an invoice if one has not been created. This can be a members invoice, a leads invoice or an invoice to a non-member via POS
Go to Accounts > Invoices > Search for the invoice you would like to bill
Click on the action button next to the invoice > request/process payment
A box will then pop up asking how you would like to process the payment:
Processing immediate payment will open the Pay Now payment window immediately for your customer to pay


Should you wish to send the customer the link to pay later do NOT select the “process immediate payment” option? Instead, just select Netcash

The member will then receive an email with a link to make a payment
The member selects Authorise payment > the link will then take the member to the above Octiv and Netcash windows to pay their invoice
2.2 Topping up sessions through the app
2.2.1 Add top up prices to packages
This functionality only works for packages that have a top up price allocated.
Go to your packages and set up a top-up price * this price is PER session – you can not top up on an entire membership
Settings > packages > click on the action button next to the package > Edit > insert top up price > save.
2.2 Topping up sessions through the app
2.2.1 Add top-up prices to packages
This functionality only works for packages that have a top-up price allocated.
Go to your packages and set up a top-up price * this price is PER session – you can not top up on an entire membership
Settings > packages > click on the action button next to the package > Edit > insert top-up price > save.
2.2.2 How Members purchase top-ups via their Ocriv profile when Integrated with Pay Now
Member logins into the app
Click the … icon in the left bottom menu bar > Packages & Sessions
Click on Top Up and Insert the number of sessions they would like to purchase > proceed
The app will then open the invoice on the screen where the member will select Pay with Netcash

On the Octiv platform:
The system will automatically generate an invoice for the app top-up under accounts > invoices
This invoice will reckon to Paid once the member’s payment was successful
Only once the payment has been successful will the sessions be released

If the payment of a member is unsuccessful the invoice can be resent to the member via request/ process payment.
The member also has the option in the app to pay the invoice at a later stage.
The top-up invoice however can also be manually recorded if wanted. Here the sessions will be released once the invoice has been recorded as paid

2.3 How Members purchase the limited package via their Ocriv profile when integrated with Pay Now
For the first time ever, members now have the option to buy packages via the app. We believe that this will aid retention by having a frictionless way to upgrade or buy a new package on-demand, without the need to have back-and-forth communication about it.
This option is only available to enabled packages.
Go to Settings > Packages > Click on the Actions button next to the package > Edit > Select or Deselect “Allow purchase of package through Octiv mobile app?”
Payment methods that are available within the app are the same payment methods selected for new sign-ups in your sign-up settings.
Once a package is purchased through the app the studio will be notified by email. This email includes the member’s name, package purchased as well as payment type.

In the app menu > Click on Packages & Sessions > Sign up for new package > Select package > Choose payment method > Accept Contract & Waiver > Sign up
For Limited packages integrated with Pay Now:
If the facility is integrated with Pay Now the member will be asked to pay immediately via credit card. Once the payment is successful the sessions are released.
The invoice is automatically created, sent and marked as paid on the Octiv platform.

2.4 How Leads purchase drop-ins via the Schedule widget Octiv profile when integrated with Pay Now
See Drop-ins https://7147743.hs-sites.com/knowledge/drop-ins
