PaySpace Payroll
Our easy to use guide will get you up and running in no time!
Service key setup
Click on Account Profile > NetConnector.
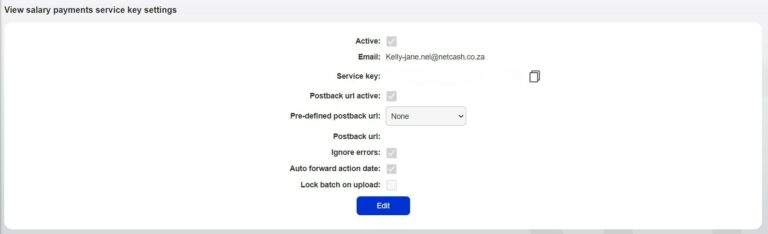
Click on Salary Payments once the following steps have been done.
– Tick the Active box.
– Insert an email address to receive notifications.
– Choose from the following options: Ignore errors, Auto forward action date or Lock batch on upload.
– Click on the Submit button.
– The service key is generated and emailed to the email address linked to the service key.
The salary payments service key is to be inserted into the salary payments file in your PaySpace payroll.
The same process for generating the salary payments key should be done for the account service key. The creditor payments key is only generated if third-party payments are to be done.
Note:
Ignore errors – If selected, any validation errors in the batch are ignored and only successful transactions are processed.
Auto forward – If selected, the batch will be moved to the next valid pay date; if your current date selection is invalid – eg. Sunday or public holiday.
Lock batch on upload – If selected, the batch cannot be edited and changes must be made in the payroll and resubmitted.
Log into PaySpace
Navigate to Company > Reports > Salary Payments Files
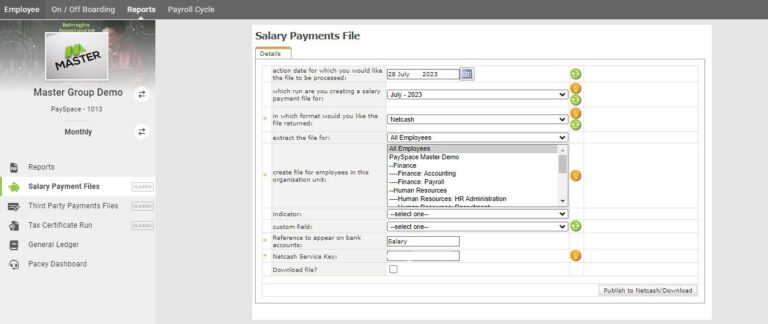
Processing a salary batch
– Select Pay date.
– Pay run (pay run month/week).
– Select Netcash as the format for the file.
– Select the category to be paid (organisational unit).
– Add a reference to appear on bank accounts.
– Insert salary payment service key in the Netcash service key tab.
Then select Publish to Netcash/Download.
Please note that if download file is ticked it will download to the desktop and not publish to Netcash. Leave unticked for Netcash upload.
The file has now been submitted to Netcash.
Log into your Netcash account to view and authorise salary batch.
Obtain a pre-authorisation report
Select Services.
Click on Payments from the dropdown menu.
Click on Salaries > Salary batches.
The list of salary batches will now be displayed.
To download your pre-authorisation report, click on Edit Clients on the left side of the salary batch that you require the report.
To download your salary batch report, click on the Download button above the right side of the table.
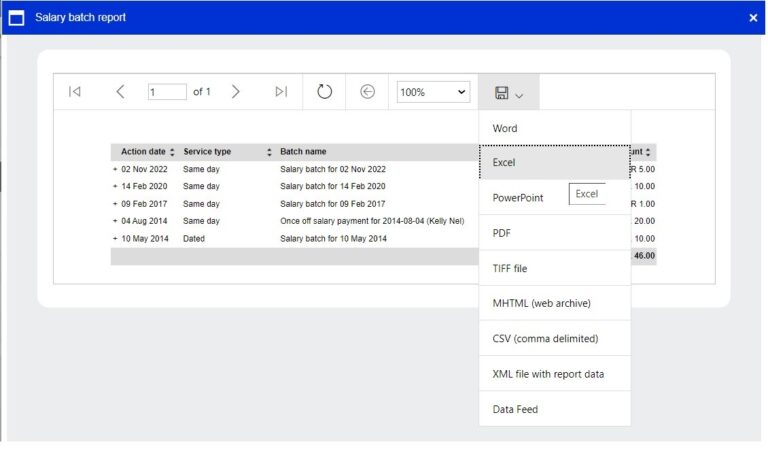
Your salary batch report will be displayed on the screen. Click on the Export icon and select the preferred format to download your report.
The batch will automatically start downloading and save in your default downloads folder.
Authorising a salary batch
Select Services.
Select Payments from the dropdown menu.
Click on Salaries > Salary batches.
The list of salary batches will be displayed.
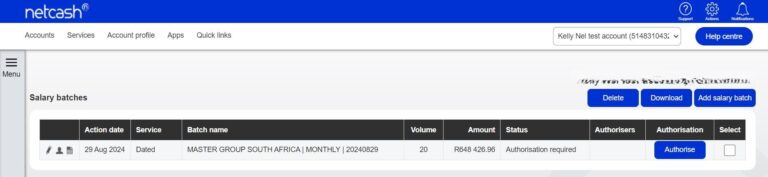
Click the Authorise button next to the batch that you would like to process.
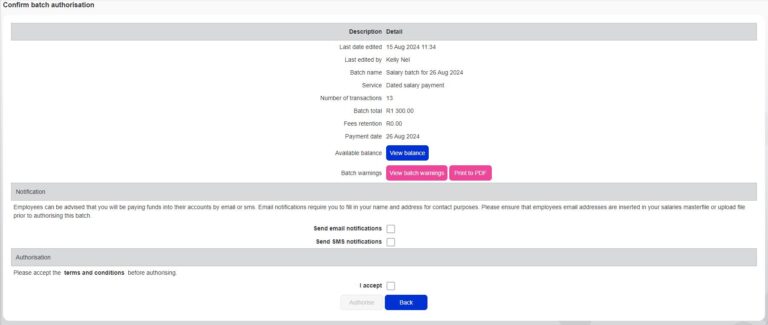
The confirm batch authorisation screen is displayed. This is a summary of the salary batch including charges, notifications and a choice of funding options:
– Use the available balance if there is sufficient credit in your Netcash account.
– Will make a bank transfers if you need to fund the Netcash clearing account for payment.
Read and accept the terms and conditions, then click on Authorise.
Should you select to pay using the Use available balance option you will then be re-directed to the Confirm batch authorisations screen.
Insert the One Time Pin (OTP) sent to your cell number or Google authenticator pin.
Click Authorise.
Your salary batch is now authorised and will be scheduled to run on the selected date.
If you require additional authorises, the batch will be awaiting further authorisation – please inform the additional authorises to log in and authorise.
If you are paying using the Will Make bank transfer option, you will be prompted to insert the following information:- The date when the transfer will be made.- The Netcash account you will be transferring to.- The amount to be transferred.- The extra fields are optional for reconciliation purposes.- Click Next.
Click on Print Report in order to obtain details of the Netcash clearing that you need to fund.
Please ensure your transfer has the correct reference.
Click Authorise to confirm your bank transfer.
Insert the One Time Pin (OTP) sent to your cell number or Google authenticator pin.
Your Salary Batch is now authorised and will be scheduled to run on the selected date.
If you require additional authorises, the batch will be awaiting further authorisation – please inform the additional authorisers of this.
One Time Pins are session-based, which means that as long as you are logged in to your Netcash account, you can use the same OTP to authorise. Where multiple authorisations are required, only the first authoriser needs to insert the OTP.
Batch reports
To obtain your post-batch authorisation report click on Services.
Click on Payments from the dropdown menu.
Click on Salaries > Salary batch reports.
The list of salary batches will now be displayed.
To download your Post-Authorisation Report, click on the printer on the left side of the Salary Batch report
Click on the Export icon.

Select your preferred format to download your report.
The batch will automatically start downloading and save in your default downloads folder.
Third-party payments
Log into your Netcach account to Generate your creditor payments service key.
Click on Account Profile > NetConnector.
Click on Creditor Payments;
– Tick the Active box
– Insert an email address to receive notifications.
– Choose from the following options: Ignore errors, Auto forward action date or Lock batch on upload.
– Click on the Submit button.
The service key is generated and emailed to the email address linked to the service key.
The creditor payments service key is to be inserted into PaySpace.
Note:
Ignore errors – If selected, any validation errors in the batch are ignored and only successful transactions are processed.
Auto forward – If selected, the batch will be moved to the next valid pay date; if your current date selection is invalid – eg. Sunday or public holiday.
Lock batch on upload – If selected, the batch cannot be edited and changes must be made in the payroll and resubmitted.
Processing a third-party batch.
- Log into your PaySpace.
- Navigate to Company > Reports > Third-party payments files.
- Navigate to third party payments file screen.
-
- Select Payment file.
- Action date.
- Select Specific run.
- Select Run on the tax year.
- Select Month.
- Create an Employee file.
- Select Netcash format.
- Insert the Netcash creditor payments service key.
- Select Publish file to Netcash/Download.
Authorise a creditor batch
Select Services.
Select Payments from the dropdown menu.
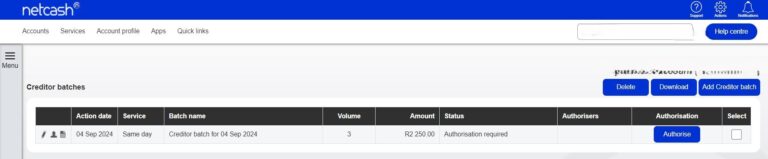
Click on Creditors > Creditor batches.
The list of creditor batches will be displayed.
Click on Authorise button next to the batch that you would like to process.
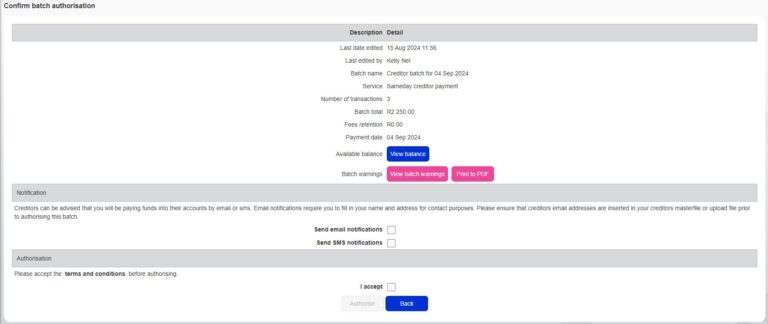
The confirm batch authorisation screen is displayed. This is a summary of the salary batch including charges, notifications and a choice of funding options:
– Use the available balance if there is sufficient credit in your Netcash account.
– Will make a bank transfers if you need to fund the Netcash clearing account for payment.
Read and accept the terms and conditions, then click on Authorise.
Should you select to pay using the Use available balance option you will then be re-directed to the Confirm batch authorisations screen.
Insert the One Time Pin (OTP) sent to your cell number or Google authenticator pin.
Click Authorise.
Your salary batch is now authorised and will be scheduled to run on the selected date.
If you require additional authorises, the batch will be awaiting further authorisation – please inform the additional authorises to log in and authorise.
If you are paying using the Will Make bank transfer option, you will be prompted to insert the following information:
– The date when the transfer will be made.
– The Netcash account you will be transferring to.
– The amount to be transferred.
– The extra fields are optional for reconciliation purposes.
– Click Next.
Click on Print Report in order to obtain details of the Netcash clearing that you need to fund.
Please ensure your transfer has the correct reference.
Click Authorise to confirm your bank transfer.
Insert the One Time Pin (OTP) sent to your cell number or Google authenticator pin.
Your Salary Batch is now authorised and will be scheduled to run on the selected date.
If you require additional authorises, the batch will be awaiting further authorisation – please inform the additional authorisers of this.
Notes: One Time Pins are session-based, which means that as long as you are logged in to your Netcash account, you can use the same OTP to authorise. Where multiple authorisations are required, only the first authoriser needs to insert the OTP.
