
Sage Payroll Advanced
Our easy to use guide will get you up and running in no time!
How to issue service keys
Netcash requires two service keys to be generated to upload salary batches from Sage Payroll Advanced. These keys do not need to be inserted into the payroll; the keys must just be generated within your Netcash account
- Account service key
- Salary payments key
Add an account service key
- Click on Account Profile.
- Click on Netconnector > Account service.
- Complete the required fields:
- Tick the active box
- Insert email address
- Predefined Postback URL – None.
- Click on Submit.
- The Service Key is now issued
Add a salary payments service key
- Click on the Account Profile tab on the black taskbar.
- Click on Netconnector > Salary payments
- Complete the required fields:
- Tick the active box
- Insert email address
- Predefined Postback URL – None.
- Select Submit.
- The Service Key is now issued
Note:
- Select Ignore errors if you would like Netcash to process payments to valid bank accounts and ignore invalid bank accounts. Leaving this option unticked will result in all payments being rejected if any one payment is invalid.
- Auto forward action date will move your payments to the next valid action date if you have missed your cutoff time.
- Lock batch on upload will not allow any editing of supplier details once the salary batch is sent to Netcash.
Exporting your salary batch
Login to Sage Payroll Advanced
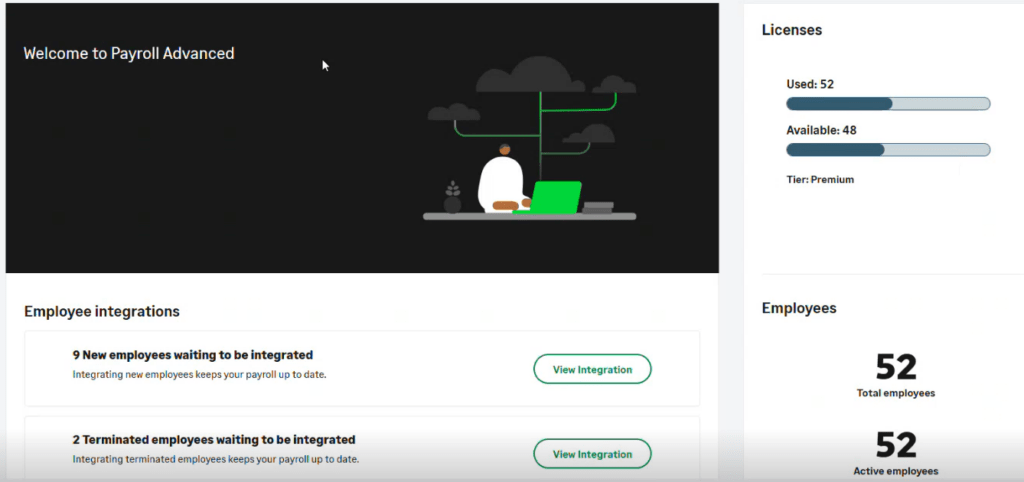
Navigate to your reports and click on view Remuneration list report
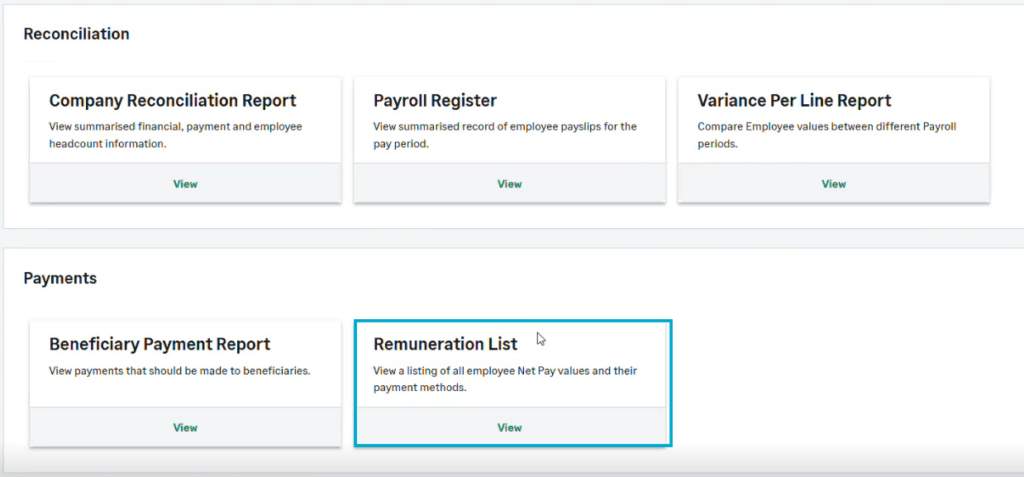
Select the company and payroll
Click on view
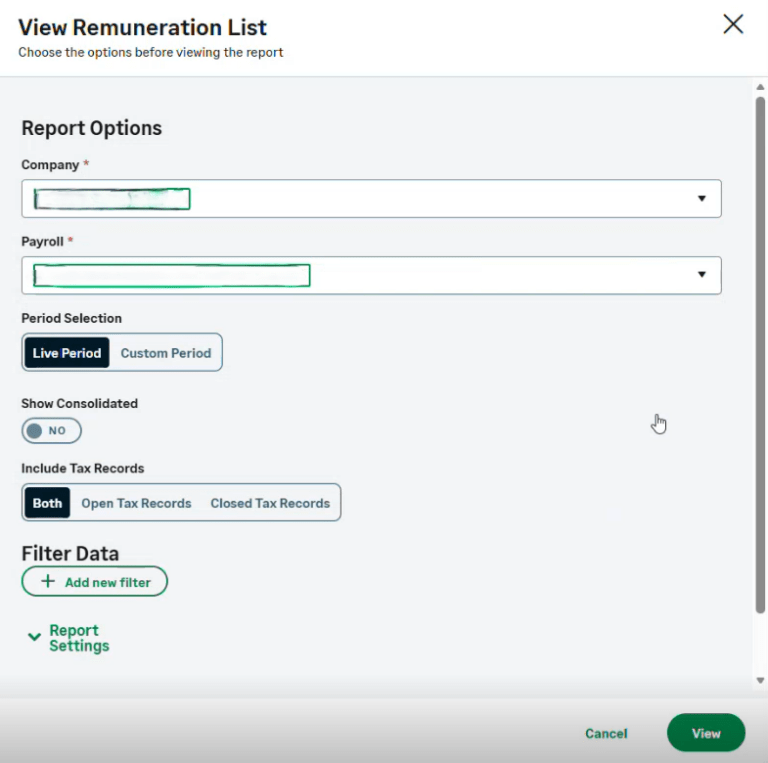
The remuneration list will be displayed, select the export dropdown and select XLSX.
The file will be downloaded to your downloads folder on your pc.
Note: A macro file is needed to import the XLSX file
Open your macro file
Click on the payment file block
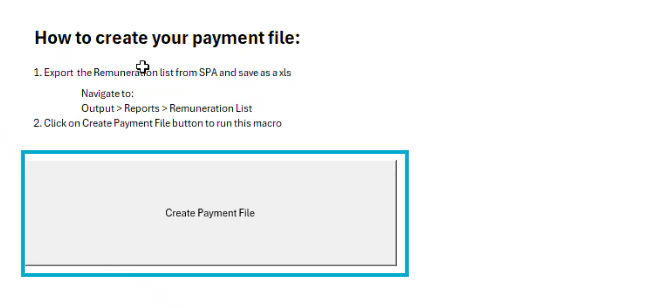
Search for the XLSX file in your downloads folder and click on open
Capture a beneficiary statement reference and click on ok
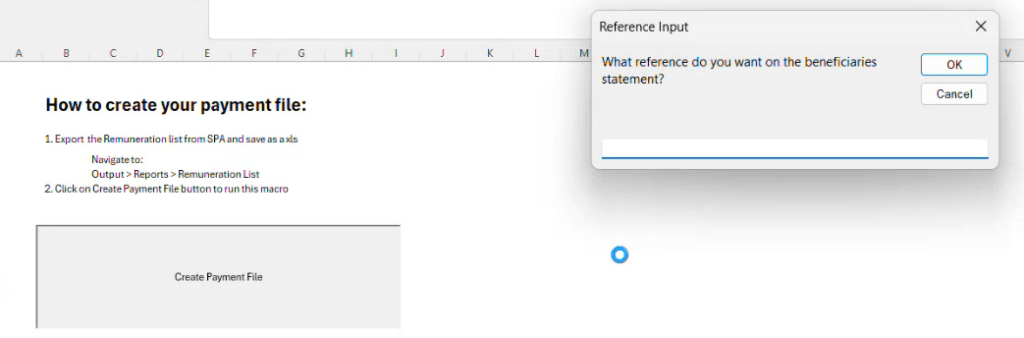
Select the destination path to save the file to your pc
Note: the file can now be imported into Netcash in the upcoming steps.
Creating your converter template (Once off)
Creating a converter template
A converter template must be created prior to uploading the payroll file. Multiple converter templates may be created for various excel files.
Note: Each converter template is matched to a specific Excel file for upload such as either a payments batch or a Debit order batch.
- Login to Netcash.
- Click on Account Profile.
- Ensure that the service keys have been issued.
Note: the service keys only needs to be created when using the Netcash converter
Guidelines for compiling Excel spreadsheets:
- All data in the spreadsheet must be formatted as “text”except amount fields which should be a number with two decimal points.
- Point only (no comma)to be used as a decimal separator in the amount field.
- Alpha /numeric characters only-no special characters.
- Only the data on Sheet 1of your workbook will be imported.
- Ensure that there are no formulasin your spreadsheet.
- Delete blank rows and columnsaround your data.
Mandatory fields:
- Account reference: Unique account reference that you will use in the future to address this customer/employee.
- Account name: Name of your customers/employee account on the Netcash system (Typically your customers/employee’s name)
- Bank Account holder name: Name of the bank account to be debited or credited (person’s name or company name)
- Bank account type: 1 = Current / Cheque 2 = Savings 3 = Transmission. Please insert the relevant digit.
- Bank account branch: Branch code of the homing account. This field MUST be 6 digits. Pre-fill with zeroes if less than 6.
- Bank account number: Bank account number of your customer/employee. May not exceed 11 digits.
- Amount: Amount includes decimal, no currency indicator. Example 2500.00 or 2500.
- Beneficiary statement reference: This field is the statement reference that appears on the customers/employee’s bank statement. It can only be used when making payments. (Maximum 20 characters)
Managing your converter templates
Navigate to Integration tools > Manage converter templates.
- Click the New Template button.
- Choose your service and instruction and click Next.

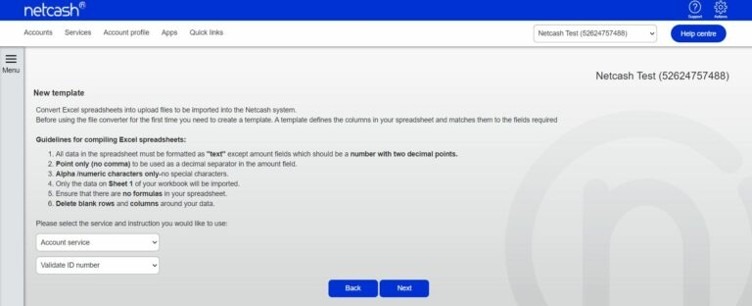
- Please take note of all the mandatory data which is required in your Excel spreadsheet > click Next.
- Choose your Excel file (the remuneration XLSX file), give your template a name and select Upload file.
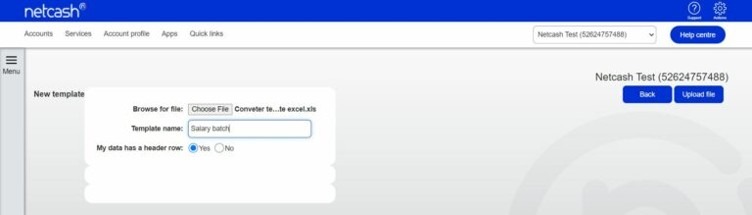
- Mandatory fields are specific to each Netcash service.
Match the Mandatory fields to the relevant field in the drop-down menu. The fields in the drop-down menus are the headers being utilized in the Excel spreadsheet you are converting. It is important that mandatory fields match your heading fields in the Excel spreadsheet
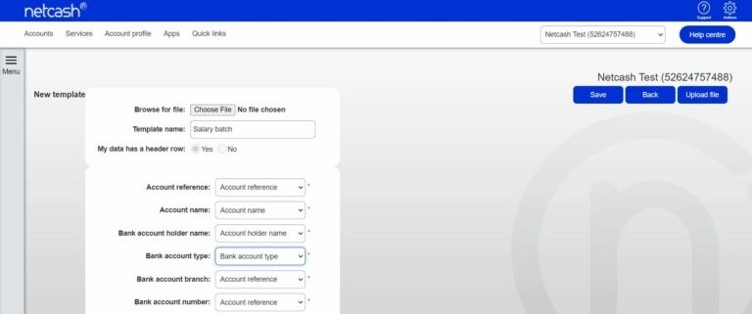
- Click on Save once all the matching is complete.
- Your template is ready to use and import your salary batch from payroll.
Uploading your salary batch via the converter
- Click on Account Profile > Integration Tools > Convert file.
- Choose your service, instruction, template and action date.
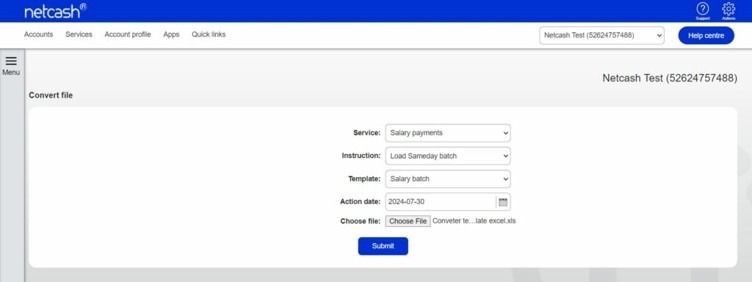
- Browse for your file and click on Submit.
- Click on Upload file.
- Click on View load report.
- The upload report is displayed and will include any invalid bank accounts for your records. Thse can be rectified in the payroll and the file re-exported for upload.
- Authorise your Batch
Notes:
- If no upload report is shown, click on Integration Tools > Batch file upload report to refresh the page.
- If it still does not appear, please ensure a service key has been generated in Netconnector for the service you are using.
- If the upload report is unsuccessful, you will be required to fix the errors in the upload report and re-submit the batch using Convert File.
Authorising your salary batch
Navigate to: Services > Payments > Salaries > Salary batches.
The list of salary batches will be displayed.
- Click on Authorise next to the batch that you would like to process.
- The confirm batch authorisation screen is displayed. This is a summary of the salary batch including charges, notifications and choice of funding options.
Batch warnings -A batch warning button displayed in pink indicates warnings in the batch. Batch warnings will display info in the batch such as duplicate bank accounts and account details changed. You can choose to make corrections or proceed to authorise the batch without amendments
- Pay against the available balance if there is sufficient credit in your Netcash account.
- Transfer funds if you need to fund the Netcash clearing account for payment
Read and accept the terms and conditions, then select Authorise.
Payment Types and Cut off times
- Should you select to pay using the Available balance option you will then be re-directed to the Confirm batch authorisations screen.
- Insert the One-Time Pin (OTP) sent to your cell number or Google Authenticator pin.
- Click OK.
- Your Salary Batch is now authorised and will be scheduled to run on the selected date.
- If you require additional authorises, the batch will be awaiting further authorisation. Please inform the additional authorisers of this.
- If you are paying using the Will Make bank transfer option, you will be prompted to insert the following information:
-
- The date when the transfer will be made.
- The Netcash account you will be transferring to.
- The amount to be transferred.
- The extra fields are optional for reconciliation purposes.
- Click Next.
- Click on a Print Report to obtain details of the Netcash clearing that you need to fund.
- To view the Netcash clearing account details in your Netcash account: Navigate to Services > Account> Manage Account> Netcash clearing accounts. (Please ensure your Netcash account number is used as the reference.)
- Click Authorise to confirm your bank transfer.
- Insert the One Time Pin (OTP) sent to your cell number or Google Authenticator pin and click Authorise.
- Your salary batch is now authorised and will be scheduled to run on the selected date.
- If you require additional authorises, the batch will be awaiting further authorisation – please inform the additional authorisers of this.